Ready to boost your email deliverability and protect your domain from spoofing?
My simple instructions will walk you through setting up your Google Workspace DKIM keys, enabling you to authenticate emails sent from your Google Workspace (Gmail) accounts.
How Does DKIM Work?
DKIM is like a digital signature for your emails, helping receiving mail providers verify that messages actually came from your domain.
Think of it as a secure handshake between your email server and the recipient’s server.
Here’s how the process works in plain English.
When you set up DKIM, you create two special keys:
- A private key that stays on your email server (like a unique signature stamp)
- A public key that you publish in your domain’s DNS records (like a signature verification guide)
Every time your organization sends an email:
- The private key adds an invisible digital signature to the email header
- The receiving server uses the public key to verify this signature
- If the signature matches, the email passes DKIM authentication
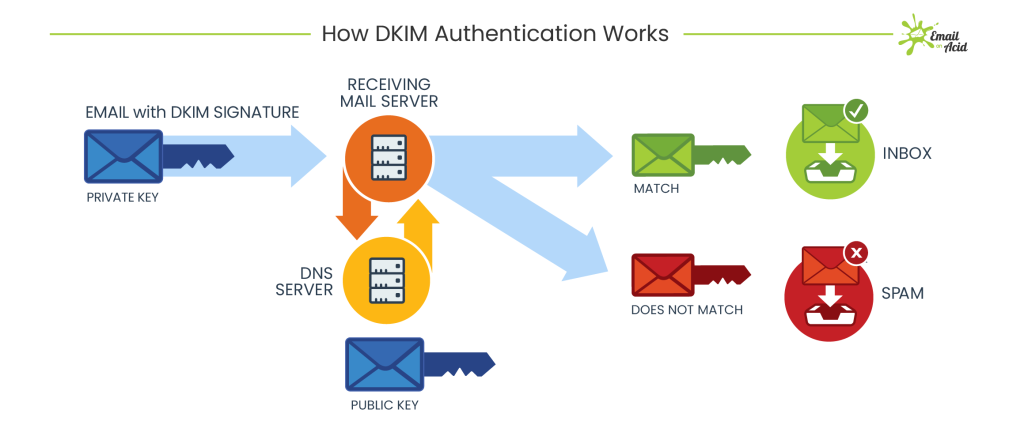
Image Source: What is DKIM for Email Authentication and How Does it Work?
Without DKIM, your legitimate emails might end up in spam folders, and malicious actors could more easily impersonate your domain.
That’s why proper setup is crucial for modern email security.
Check if Google Workspace DKIM is Already Set Up
Before diving into setup, let’s check if DKIM is already configured for your domain.
This process is straightforward!
- Visit the Hello Inbox homepage
- Enter your domain name
- Click the Check My Domain button
- Look for the Google (Gmail) DKIM record.
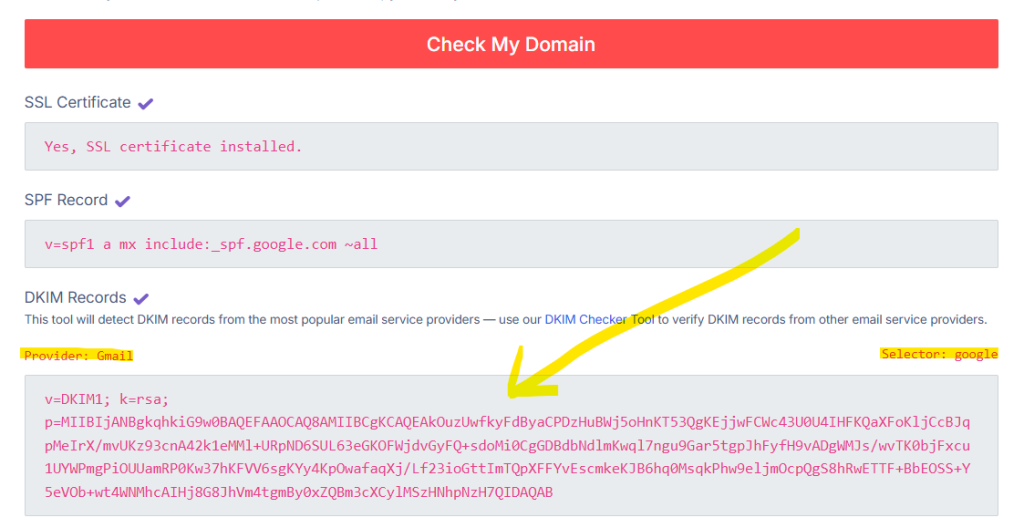
If the tool doesn’t display a Google (Gmail) DKIM record for your domain then you know it’s not already set up.
Pro Tip: If you use Google Domains or Squarespace as your domain provider, you’re in luck! They automatically create and add DKIM keys to your DNS records. You can skip ahead to the “Turn on DKIM Authentication” section.
Generate a DKIM Key
Now for the next part – generating your DKIM key pair!
This process creates the cryptographic keys that will secure your email authentication.
Important Note: After enabling Gmail for your organization, wait 24-72 hours before generating DKIM keys.
Attempting this too early might result in error messages.
Follow these steps in your Google Workspace Admin Console:
- Sign in with a super administrator account at admin.google.com
- Navigate to: Apps > Google Workspace > Gmail > Authenticate email
- Select your domain from the dropdown
- Click “Generate New Record”
- Choose your key settings:
- Key Length:
- 2048-bit (Recommended for maximum security)
- 1024-bit (Fallback if your domain provider has limitations)
- Prefix Selector:
- Use “google” (default recommendation)
- Choose a different prefix if “google” is already in use
- Key Length:
Pro Tip: Always opt for 2048-bit keys when possible. They provide stronger security and future-proofing for your email authentication.

Add Google Workspace DKIM to Your Domain
With your DKIM key generated, it’s time to add it to your domain’s DNS records.
This step publishes your public key where receiving servers can find it.
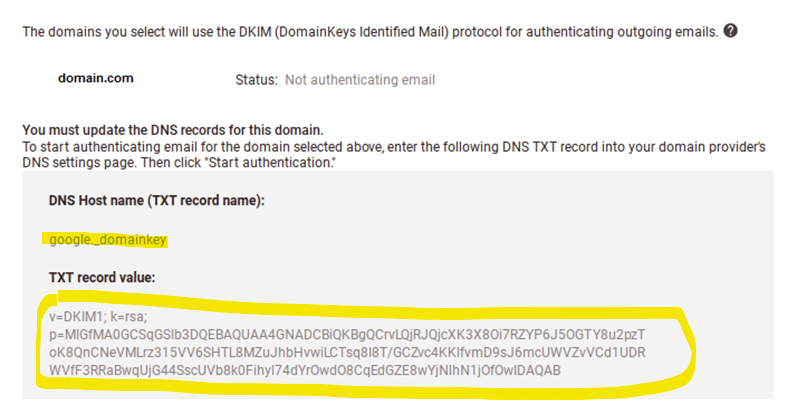
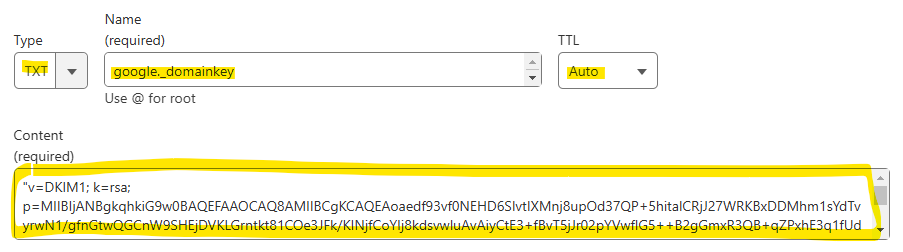
- Copy these values from your Admin Console (see screenshot below):
- DNS Host name (TXT record name)
- TXT record value (your DKIM key)
- Log into your domain provider’s dashboard
- Not sure who your provider is? Check your domain registration emails or use WHOIS lookup
- Navigate to DNS settings or DNS management
- Look for “DNS Configuration,” “DNS Records,” or similar options
- Each provider’s interface is different, but the concept is the same
- Add a new TXT record with these settings (see screenshot below):
- Type: TXT
- Host/Name: Paste the DNS Host name from step 1
- Value: Paste the TXT record value from step 1
- TTL: 3600 seconds (1 hour) if customizable
Important: Some domain providers limit TXT record length. If you encounter this issue:
- Contact your provider’s support
- Consider splitting the record (but only if explicitly supported)
- Document any special formatting requirements
Turn on DKIM Authentication
You’re almost there! Now it’s time to activate DKIM signing for your domain.
This step tells Google Workspace to start adding DKIM signatures to your outgoing emails.
- Return to the Google Admin Console
- Navigate back to Apps > Google Workspace > Gmail > Authenticate email
- Select your domain
- Click “Start authentication”
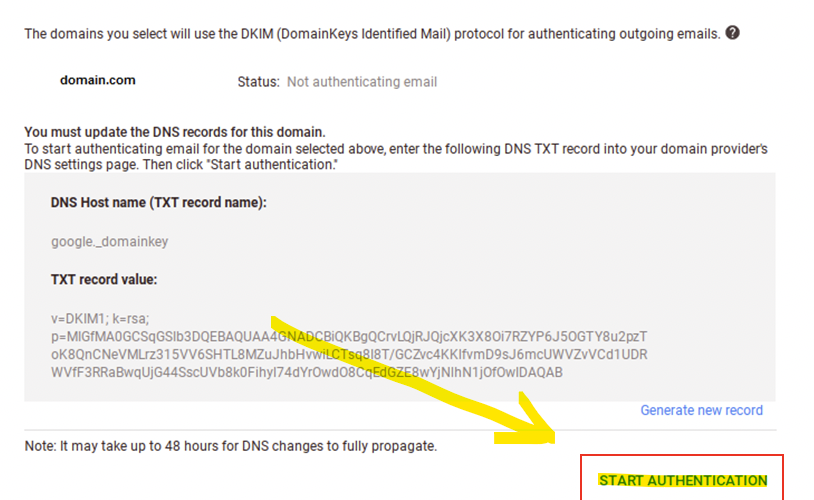
Watch for the status change to “Authenticating email with DKIM” – this confirms successful activation.
Note: Changes can take up to 48 hours to fully propagate through DNS systems. During this time, you might see a message about updating DNS records – this is normal and can be safely ignored if you’ve completed all previous steps correctly.
Perform Test to Verify DKIM is Working
Now let’s verify your DKIM setup is working correctly.
Test Manually
- Send a test email to an external Gmail account (not your own)
- In the recipient’s inbox:
- Open the message
- Click the three dots (More options)
- Select “Show original”
- Look for “Authentication-Results” in the header
- Success looks like: “DKIM=pass” or “DKIM=OK”
- No DKIM information? Double-check your setup steps
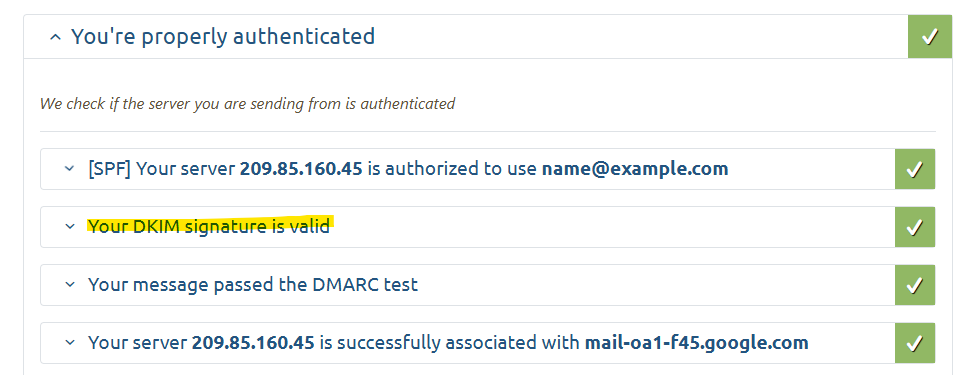
Test with a tool
- Visit Mail-Tester.com
- Send an email to the address generated for you
- Click the blue button Then check your score
- Scroll down and expand tab You’re properly (or not) authenticated
- Verify that your DKIM signature is valid
Frequently Asked Questions
Q: How long does DKIM setup take?
A: The actual configuration takes about 30 minutes, but allow 24-72 hours for full propagation and verification.
Q: Will DKIM affect my existing emails?
A: No, DKIM only applies to emails sent after activation. Existing emails remain unchanged.
Q: What if my domain provider doesn’t support 2048-bit keys?
A: Use 1024-bit keys as a temporary solution while exploring alternative domain providers that support stronger security.
Q: Do I need DKIM for subdomains?
A: Yes, if you send emails from subdomains, you’ll need separate DKIM records for each one. Generate unique keys for each subdomain.
Q: What’s next after DKIM?
A: Consider implementing a DMARC record for enhanced protection and an SPF record if not already configured.
Q: What if my emails are going to spam?
A: Read this article on how to fix Google Workspace emails going to spam.
