If you’re using HubSpot and noticing your carefully crafted emails aren’t reaching inboxes, you’re not alone.
In this comprehensive guide, I’ll walk you through actionable steps to fix your HubSpot emails that are landing in spam.
We’ll cover everything from authentication setup to reputation management, with practical solutions you can implement today.
Here are the topics we’ll cover in this article:
- Check current authentication records
- Set up SPF record
- Set up email authentication
- Set up DMARC record and monitoring
- Add your domain to Google Postmaster Tools
- Check reports in Google Postmaster Tools
- Check sending IP address reputation
- Check Spam Reports and Hard Bounce rate
- How to reduce Spam Complaint and Hard Bounce rate
- Check subject line for words or special characters
- Check content for words, images or links
- Check image-to-text and link-to-text ratio
- Verify if descriptive image alt tags are present
- Perform a test and see where it goes
- Repair poor domain reputation
- Frequently asked questions
If your HubSpot marketing emails are being flagged as spam, it’s likely due to one or more of these common issues:
- Incomplete authentication: Missing or improperly configured SPF, DKIM, or DMARC records
- Poor sending reputation: High bounce rates, spam complaints, or low engagement
- Content triggers: Specific words, formatting, or design elements that trigger spam filters
- Technical issues: IP reputation problems or email infrastructure issues
The good news? Each of these issues has a solution.
Recent changes from major email providers like Gmail and Yahoo have made proper authentication mandatory for bulk senders, making this guide more important than ever.
By following the steps outlined below, you’ll be able to:
- Properly authenticate your domain
- Monitor and improve your sender reputation
- Optimize your email content to avoid spam triggers
- Implement best practices to maximize deliverability
Let’s dive in and get your HubSpot emails back to the inbox where they belong!
Check current authentication records
Before making any changes, it’s essential to understand your current domain authentication setup.
Our Check My Domain tool provides a quick and easy way to assess your domain’s email authentication status.
Here’s how to use this helpful tool:
- Visit the Hello Inbox homepage
- Enter the domain you use for sending emails from HubSpot
- Click “Check My Domain”
The tool will analyze your domain and provide a comprehensive report on your current authentication setup, including:
- SPF record status
- DKIM configuration
- DMARC policy
- Overall authentication score
This gives you a clear picture of what’s already in place and what needs fixing.
Common issues you might find include:
- Missing authentication or MX records
- Incomplete or incorrectly formatted records
- Conflicting records
- Weak DMARC policies
If you find any authentication issues, don’t worry—we’ll cover how to fix each one in the upcoming sections.
Set up SPF record for Hubspot
SPF (Sender Policy Framework) records are essential for email authentication.
They tell receiving email servers which IP addresses are authorized to send emails on behalf of your domain.
Without a proper SPF record, email providers may mark your messages as suspicious or spam.
Understanding SPF Records
An SPF record is a TXT record in your domain’s DNS settings that lists all servers authorized to send email from your domain.
When an email server receives a message from your domain, it checks this record to verify the sending server is legitimate.
How to add HubSpot to Your SPF Record
- Create or update your SPF record: If you don’t have an SPF record, you’ll need to create one. If you already have one, you’ll need to update it to include HubSpot.
- Access your DNS provider: Log into your domain registrar or DNS provider (such as GoDaddy, Cloudflare, or AWS).
- Add or modify the SPF record: In your DNS settings, add HubSpot’s SPF information to your record.
Here’s the syntax you’ll need:
If you don’t have an existing SPF record:
v=spf1 include:hubspot.net ~allIf you already have an SPF record, add HubSpot’s include statement before the final mechanism:
v=spf1 include:existingservice.com include:hubspot.net ~all- Important considerations:
- SPF records can only have one
v=spf1tag per domain - You can have up to 10
includestatements - Always place the
~allor-allat the end of the record - Avoid “SPF flattening” features offered by some DNS providers
- SPF records can only have one
- Verify your SPF record: After making changes, use our tool again to verify your SPF record is correctly formatted and includes HubSpot.
Remember that DNS changes can take anywhere from a few minutes to 48 hours to propagate globally, so be patient if the verification doesn’t immediately show your changes.
Set up email authentication in Hubspot
Properly authenticating your email sending domain within HubSpot is a critical step for ensuring your marketing emails reach your recipients’ inboxes rather than landing in spam folders.
HubSpot makes this process relatively straightforward with their guided setup process.
Step-by-Step Authentication Process
- Access domain settings:
- In your HubSpot account, click the settings icon in the top navigation bar
- Navigate to Content > Domains & URLs
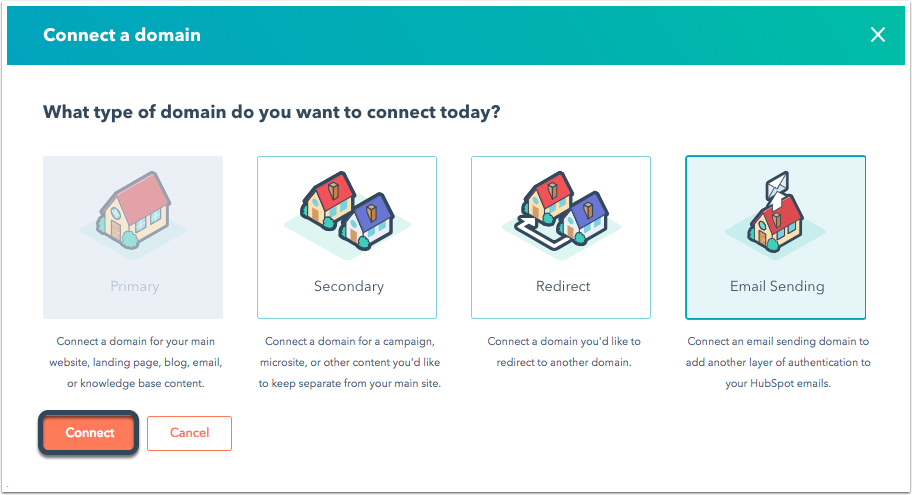
- Click “Connect a domain” in the top right corner
- Select “Email Sending” and click “Connect”
- Enter your email information:
- Enter an email address you use to send marketing emails
- Verify that the email sending domain is correct
- Click “Next”
- Choose your DNS provider connection method:
- For common providers (GoDaddy, AWS, IONOS, Namecheap, Cloudflare), you can click “Sign in with [provider]” for a streamlined process
- Otherwise, select “No, I’ll set it up manually”
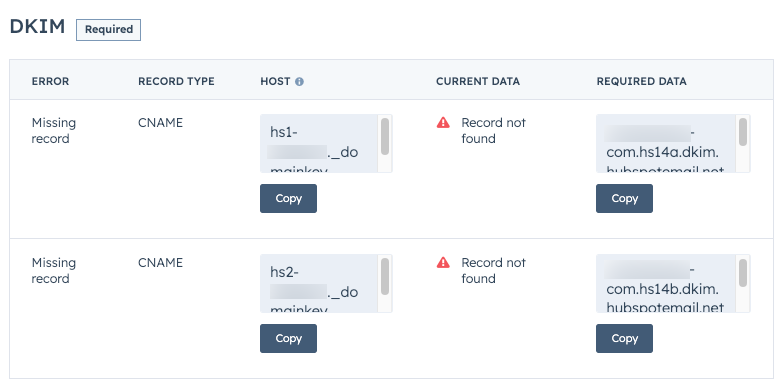
- Configure DKIM records:
- HubSpot will provide you with two CNAME records to add to your DNS settings
- Copy the Host and Required Data values for each record
- Add these as CNAME records in your DNS provider
- Configure SPF record:
- Add HubSpot’s SPF record as a TXT record in your DNS provider
- If you already have an SPF record, follow the instructions in the previous section to combine them
- Configure DMARC record:
- Add the provided DMARC record as a TXT record in your DNS settings
- The default policy provided by HubSpot is minimal but will get you started
- Verify your records:
- After adding each record, click “Verify” in HubSpot to check if it’s correctly configured
- Note that DNS verification can take from 15 minutes to several hours
Important Considerations
- You need access to your DNS provider to make these changes
- Cloudflare users should ensure that domain-wide CNAME flattening and proxy settings are turned off
- You can connect a subdomain (like info.yourdomain.com) as your email sending domain
- The subdomain you connect should match the domain in your “From” email address
- If you’re not comfortable making DNS changes, consider hiring us to do this for you
Once your domain is authenticated, HubSpot will display the status for each authentication method (DKIM, SPF, and DMARC) in your domain settings.
A fully authenticated domain will show “Authenticated” status for all three components.
Remember that proper authentication is now mandatory for sending bulk emails to Gmail and Yahoo addresses.
Without it, your emails will likely be automatically blocked or sent to spam folders, regardless of content quality.
Set up DMARC record and monitoring
While HubSpot will help you set up a basic DMARC record, implementing a more robust DMARC policy and monitoring its performance is critical for long-term email deliverability success.
DMARC (Domain-based Message Authentication, Reporting, and Conformance) builds upon SPF and DKIM to provide clear instructions on how to handle authentication failures.
Understanding DMARC
DMARC does three essential things:
- Tells receiving servers what to do with emails that fail authentication
- Provides a feedback mechanism so you can monitor email authentication
- Aligns your SPF and DKIM policies for stronger protection
Set up a DMARC Record
- Start with the basic DMARC record HubSpot provides, which typically looks like:
v=DMARC1; p=none; - Enhance your DMARC record to include reporting:
v=DMARC1; p=none; rua=mailto:[email protected]; ruf=mailto:[email protected]; fo=1; - Add the record to your DNS:
- Create a TXT record with the host name:
_dmarc.yourdomain.com - Add your enhanced DMARC policy as the value
- Save the changes
- Create a TXT record with the host name:

Set up Free DMARC Monitoring with Postmark
Postmark offers a free DMARC monitoring service that helps you interpret the reports generated by your DMARC policy:
- Visit https://dmarc.postmarkapp.com/
- Enter the email address you want to receive reports
- Add your domain and follow the setup instructions
- Update your DMARC record to send reports to Postmark’s aggregation address
Once configured, Postmark will:
- Collect and analyze DMARC reports from email providers
- Present the data in an easy-to-understand dashboard
- Alert you to authentication failures
- Help you identify unauthorized senders using your domain
DMARC Policy Progression
It’s best to implement DMARC in stages:
- Start with monitoring mode (
p=none) – Collect data without affecting delivery - Move to quarantine mode (
p=quarantine) – Send failing emails to spam folders - Finally implement rejection (
p=reject) – Block emails that fail authentication
Each stage should last at least 2-4 weeks while you monitor reports and fix any issues before increasing the policy strength.
Benefits of Proper DMARC Implementation
- Improved deliverability for authenticated emails
- Protection against email spoofing and phishing attempts
- Visibility into all sources sending email from your domain
- Compliance with best practices required by major email providers
By setting up DMARC monitoring with Postmark, you gain valuable insights into your email authentication performance and can proactively address issues before they impact your deliverability.
Remember, DMARC is not just about blocking bad actors—it’s about building trust with email providers and establishing your domain as a legitimate sender that follows best practices.
Add your domain to Google Postmaster Tools
Google Postmaster Tools provides critical insights into how Gmail—one of the largest email providers—views and handles your email campaigns.
Since Gmail represents a significant portion of most email lists, understanding how your emails perform with Gmail users is essential for improving overall deliverability.
Benefits of Google Postmaster Tools
- Direct access to Gmail’s data about your email performance
- Reputation monitoring across multiple dimensions
- Early warning of potential deliverability issues
- Insights not available in your email service provider’s analytics
How to set up Google Postmaster Tools
- Create a Google Postmaster Tools account:
- Visit postmaster.google.com
- Sign in with your Google account (preferably a company account)
- Add your domain:
- Click the “+” button to add a domain
- Enter the domain you use for sending emails from HubSpot
- Click “Next”
- Verify domain ownership:
- Google will provide a TXT record to add to your DNS
- Log into your DNS provider and add the verification record
- The record should be added at the root level of your domain
- Once added, return to Postmaster Tools and click “Verify”
- Wait for data collection:
- It can take 2-3 days for data to start appearing
- For comprehensive data, you’ll need a history of sending emails to Gmail users
Key Metrics to Monitor
Once your domain is verified and data starts flowing, focus on these critical metrics:
- Domain Reputation:
- Shows how Gmail rates your sending domain from “Bad” to “High”
- This is perhaps the most important metric to track
- Domains with “High” reputation enjoy the best inbox placement
- IP Reputation:
- Similar to domain reputation but focused on the sending IP
- Important if you use a dedicated IP with HubSpot
- Less relevant if you use HubSpot’s shared IPs
- Spam Rate:
- Shows the percentage of your emails marked as spam by users
- Keep this as low as possible (under 0.1% is ideal)
- Spikes indicate content or targeting issues
- Authentication:
- Shows the percentage of emails that pass authentication checks
- Should consistently be at or near 100%
- Delivery Errors:
- Indicates technical issues preventing your emails from being processed normally by Gmail
How to Use This Data
- Regular monitoring: Check at least weekly for any changes in reputation or spam rates
- Campaign correlation: Match Postmaster data with your campaign calendar to identify problematic content
- Trend analysis: Watch for gradual declines in reputation that may indicate growing issues
- Authentication verification: Ensure your authentication records remain properly configured
Google Postmaster Tools provides the closest thing to a direct window into Gmail’s spam filtering decisions.
By regularly monitoring these metrics, you can catch and address deliverability issues before they significantly impact your marketing results.
Remember that reputation metrics are typically displayed as relative values rather than absolute scores, so watch for changes over time rather than focusing on achieving a specific number.
Check Reports in Google Postmaster Tools
Once you’ve set up Google Postmaster Tools, it’s time to leverage the wealth of data it provides to diagnose and fix deliverability issues.
Let’s examine how to interpret the three most critical reports for troubleshooting HubSpot emails going to spam.
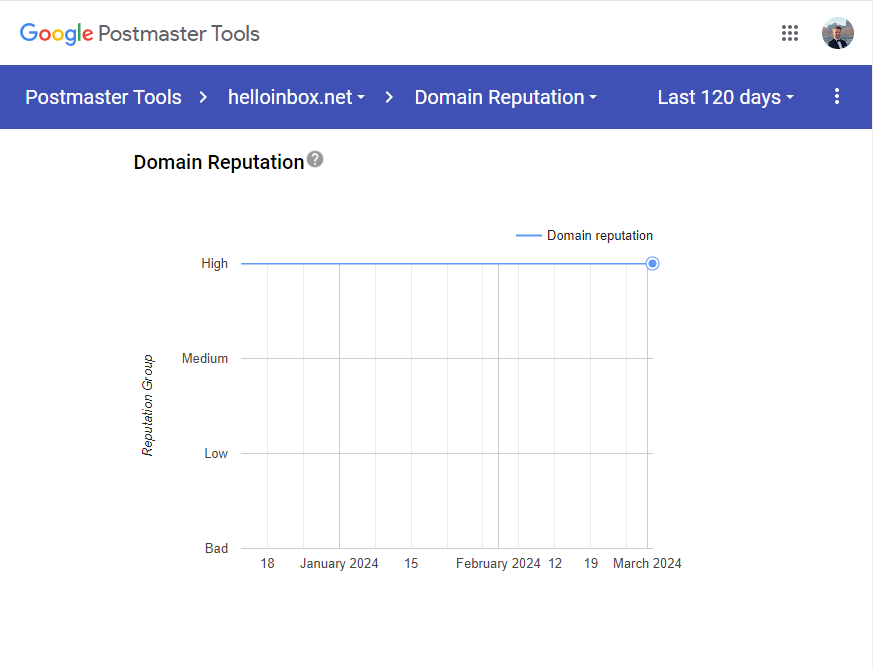
Domain Reputation Analysis
Your domain reputation is the cornerstone of Gmail deliverability.
It’s like a credit score for your email sending practices.
- Accessing the Domain Reputation dashboard:
- Navigate to your domain in Google Postmaster Tools
- Select “Domain reputation” from the left sidebar
- Understanding the reputation levels:
- High: Most emails reach the inbox with no issues
- Medium: Generally good deliverability but some emails may be filtered
- Low: Significant delivery problems likely
- Bad: Most emails will be blocked or sent to spam
- Interpreting reputation changes:
- Sudden drops often indicate a problematic campaign or technical issue
- Gradual declines suggest ongoing issues with engagement or list quality
- Improvements typically follow remediation efforts but may take weeks to fully recover
- Action steps for poor reputation:
- If “Bad” or “Low”: Pause bulk sending temporarily
- If “Medium”: Review recent campaign practices
- For all levels below “High”: Implement the remaining recommendations in this guide
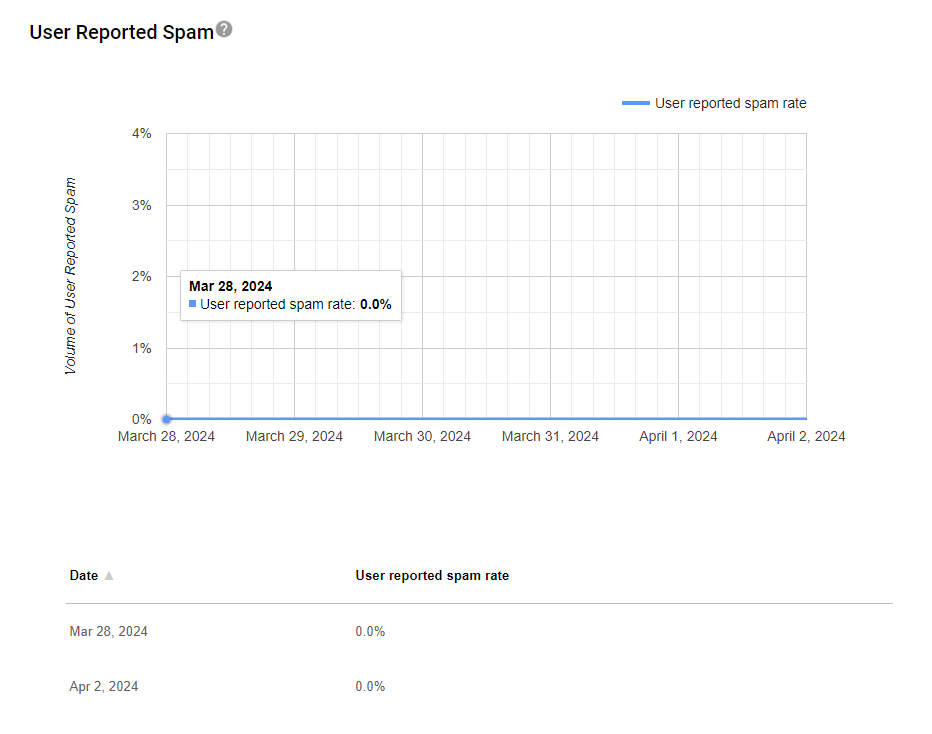
Spam Rate Monitoring
The spam rate report shows the percentage of your emails that recipients marked as spam—a direct signal of how your audience perceives your content.
- Accessing the Spam Rate dashboard:
- Select “Spam rate” from the left sidebar
- Interpreting spam rates:
- Less than 0.1%: Excellent performance
- 0.1% – 0.3%: Good, but room for improvement
- 0.3% – 1%: Concerning, requires attention
- Above 1%: Critical issue requiring immediate action
- Identifying problematic patterns:
- Correlate spikes with specific campaigns
- Look for day-of-week or time-of-day patterns
- Check if spam rates increase with certain content types
- Remediation strategies:
- Review the content of campaigns with high spam rates
- Check targeting and segmentation practices
- Consider reducing frequency for less engaged segments
- Implement sunset policies for non-engaging subscribers
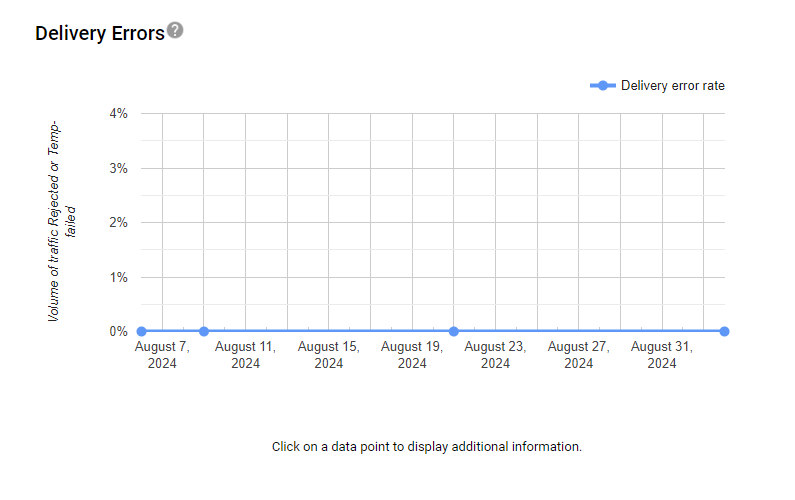
Delivery Errors Investigation
Delivery errors indicate technical issues preventing your emails from being processed normally by Gmail.
- Accessing the Delivery Errors dashboard:
- Select “Delivery errors” from the left sidebar
- Common error types:
- DNS errors: Problems with your domain configuration
- Timeout errors: Connection issues with your sending infrastructure
- Rate limit exceeded: Sending too many emails too quickly
- Authentication failure: Problems with SPF, DKIM, or DMARC
- Troubleshooting approaches:
- For DNS errors: Verify your domain’s DNS records are correctly configured
- For timeout errors: Contact HubSpot support as this may be an issue on their end
- For rate limit issues: Spread out large campaigns or reduce sending volume
- For authentication failures: Revisit the authentication setup sections of this guide
Establish a Monitoring Routine
To maximize the value of Google Postmaster Tools:
- Create a weekly check-in schedule:
- Set a recurring calendar reminder
- Document baseline metrics for comparison
- Note any significant changes
- Correlate with HubSpot data:
- Match campaign sends with reputation changes
- Compare open rates in HubSpot with reputation in Postmaster Tools
- Track improvements after implementing changes
- Look for leading indicators:
- Spam rate increases often precede reputation drops
- Authentication failures may indicate imminent delivery problems
By systematically monitoring these reports, you’ll develop a deeper understanding of how Gmail views your email program and be able to take proactive steps before major deliverability issues impact your results.
Remember that reputation metrics in Google Postmaster Tools typically reflect a trailing 30-day window, so improvements may take time to become visible after implementing fixes.
Check sending IP address reputation
Your sending IP address’s reputation is another critical factor affecting email deliverability.
Even with perfect authentication and great content, a poor IP reputation can send your emails straight to the spam folder.
Let’s explore how to check and manage your IP reputation.
Understanding IP Reputation in the HubSpot Context
HubSpot uses two types of IP setups for sending emails:
- Shared IPs: The default for most HubSpot accounts, where you share sending infrastructure with other HubSpot customers
- Dedicated IPs: Available to higher-tier customers or as an add-on, giving you exclusive use of specific IP addresses
Each approach has different implications for reputation management:
- Shared IPs: Your reputation is influenced by other HubSpot customers’ sending practices
- Dedicated IPs: You have full control over (and responsibility for) your sending reputation
How to Check Your Sending IP Reputation
- Identify your sending IP address:
- Send a test email to yourself
- View the email headers (this varies by email client)
- Look for the “Received” or “X-Originating-IP” field
- Note the IP address that appears
- Use third-party IP reputation tools:
- MXToolbox: Check if your IP is on any blacklists
- SenderScore: Get a reputation score from 0-100
- TalosIntelligence: View Cisco’s reputation data
- For dedicated IP users, check HubSpot’s built-in tools:
- Navigate to Marketing > Email > Settings
- Select “Dedicated IP” from the sidebar
- Review the IP health information provided
Interpreting IP Reputation Results
- Blacklist appearances: Even one major blacklisting can significantly impact deliverability
- Sender Scores:
- 90-100: Excellent, should not have IP-related deliverability issues
- 80-89: Good, minor deliverability impact
- 70-79: Average, may cause some deliverability problems
- Below 70: Poor, likely causing significant deliverability issues
Address IP Reputation Issues
For Shared IP Users:
- Contact HubSpot support:
- If your research indicates the shared IP pool has reputation issues
- HubSpot can sometimes move you to a different IP pool
- Consider upgrading to a dedicated IP if:
- You send more than 50,000 emails per month
- You have strict deliverability requirements
- You’ve consistently maintained good email practices
- Focus on your domain reputation:
- With shared IPs, your domain reputation becomes even more important
- Implement all the authentication steps outlined earlier
For Dedicated IP Users:
- Implement IP warming:
- If you recently acquired a dedicated IP
- Gradually increase sending volume over 4-6 weeks
- Follow HubSpot’s IP warming schedule
- Maintain consistent sending patterns:
- Send emails on a regular schedule
- Avoid long gaps between sends
- Keep daily volumes relatively stable
- Segment your highest-engagement contacts:
- Send to your most engaged contacts first
- This builds positive reputation signals
- Gradually incorporate less engaged segments
- If blacklisted, request delisting:
- Each blacklist has its own removal process
- Some require formal requests
- Others automatically delist after fixed periods of good behavior
Monitor IP Reputation Over Time
Set up a monthly IP reputation check:
- Check all major blacklists
- Review your Sender Score
- Compare with previous months to identify trends
- Correlate with changes in email practices or content
Remember that IP reputation is dynamic and constantly changing based on recipient engagement and sending practices.
Consistent monitoring and maintenance are essential for long-term deliverability success.
For most HubSpot users on shared IPs, domain reputation will have a more significant impact than IP reputation.
However, understanding both aspects gives you the complete picture needed to solve deliverability challenges.
Check Spam Reports and Hard Bounce rate with Hubspot’s email health tool
HubSpot’s email health tool provides valuable insights into your email performance metrics, helping you identify and address issues that could be sending your emails to spam folders.
By regularly monitoring these metrics, you can catch problems early and make necessary adjustments to improve deliverability.
Access the Email Health Dashboard
- Log into your HubSpot account
- Navigate to Marketing > Marketing Email
- Click the “Health” tab
Note that you need to have sent at least 400 emails in the last 30 days to access this tool, and the data excludes the last 48 hours.
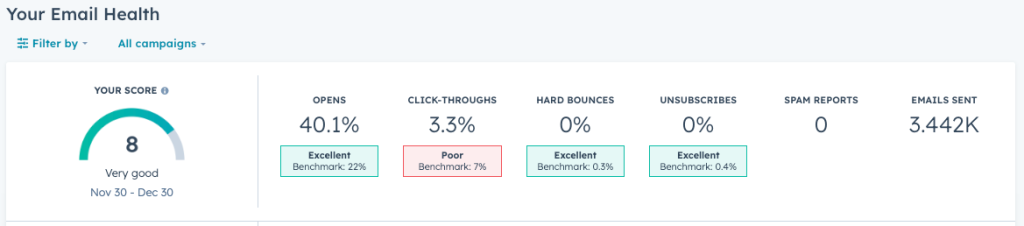
Understanding Key Metrics
The email health dashboard provides several critical metrics, but two are particularly important when troubleshooting spam issues:
1. Spam Reports
Spam reports occur when recipients manually mark your email as spam or junk. This is one of the strongest negative signals to email providers about your sending practices.
- Industry benchmark: Should be under 0.1% (less than 1 per 1,000 emails)
- Warning signs: Any consistent spam report rate above 0.1% requires immediate attention
- Critical level: Rates above 0.3% indicate serious problems that could damage your sender reputation
To analyze spam reports in detail:
- Click on “Spam reports” in the left sidebar
- Review the detailed breakdown and historical trends
- Pay attention to any spikes that correlate with specific campaigns
2. Hard Bounce Rate
Hard bounces occur when emails can’t be delivered permanently, often due to invalid email addresses or domain issues. High hard bounce rates signal poor list management to email providers.
- Industry benchmark: Should be under 2%
- Warning signs: Rates between 2-5% indicate list quality issues
- Critical level: Rates above 5% suggest significant problems with your email list
To analyze hard bounces in detail:
- Click on “Hard bounces” in the left sidebar
- Review the breakdown by campaign and time period
- Look for patterns in the types of addresses bouncing
Analyze Your Email Health Score
HubSpot provides an overall health score (1-10) based on your aggregate metrics:
- 1-2: Poor – Urgent remediation needed
- 3-4: Needs work – Significant improvements required
- 5-6: Okay – Room for improvement
- 7-8: Good – Solid performance
- 9-10: Excellent – Exceptional email practices
This score helps you quickly assess your overall email performance and track improvements over time.
Use Filtering Options for Deeper Insights
To pinpoint specific problem areas:
- Click the filter icon at the top of the page
- Filter by:
- Campaign: Identify problematic specific campaigns
- Email type: Compare regular, automated, and transactional emails
- Subscription type: See if certain subscription categories have higher issue rates
- Compare against industry benchmarks:
- Select “Compare to” and choose your industry for relevant comparisons
- This helps you understand if your metrics are typical for your sector
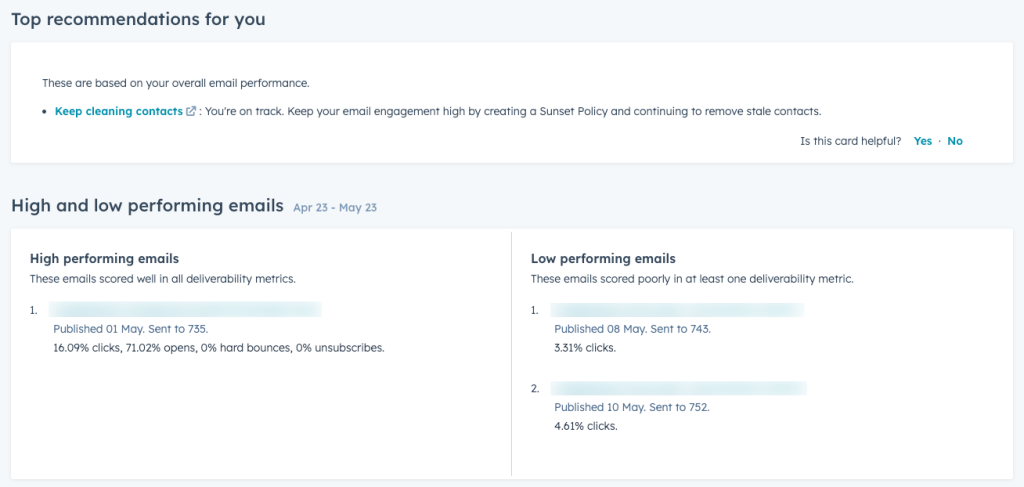
Leverage HubSpot’s Recommendations
The “Top recommendations for you” section provides personalized advice based on your metrics. Pay special attention to these as they’re tailored to your specific situation.
Create an Action Plan Based on Health Data
- For high spam report rates:
- Review the content of campaigns with the highest rates
- Check your subscription practices and permission levels
- Ensure expectations are set during the signup process
- Consider reducing frequency or improving segmentation
- For high hard bounce rates:
- Implement list cleaning procedures
- Review your data collection methods
- Consider using double opt-in for new subscribers
- Remove long-term inactive subscribers
- Track improvement over time:
- Document your baseline metrics
- Implement changes one at a time to identify what works
- Monitor the “Score over time” chart to see long-term trends
By consistently using HubSpot’s email health tool, you’ll gain valuable insights into your email performance and be able to make data-driven decisions to improve deliverability.
How to reduce Spam Complaint and Hard Bounce rate
High spam complaint and hard bounce rates are direct signals to email providers that your messages may be unwanted—leading them to route future emails to the spam folder.
Let’s explore practical strategies to reduce these critical metrics and improve your deliverability.
Reducing Spam Complaints
Spam complaints occur when recipients actively mark your email as spam.
Every complaint damages your reputation with email providers.
1. Improve Permission Practices
- Implement explicit consent: Use clear opt-in processes where subscribers actively choose to receive your emails
- Double opt-in: Consider requiring email confirmation before adding new contacts to your lists
- Document permission sources: Track when and how each contact opted in
- Audit historic lists: Remove contacts with unclear permission history
2. Set Clear Expectations
- Be specific at signup: Clearly state what content you’ll send and how often
- Welcome series: Send a welcome email outlining what subscribers can expect
- Consistent sending patterns: Maintain regular sending schedules
- Brand recognition: Ensure your “From” name is instantly recognizable
3. Improve Content Relevance
- Segment your audience: Send only relevant content based on subscriber interests
- Personalize beyond name: Include content tailored to subscriber behavior or preferences
- A/B test subject lines: Identify which approaches resonate without triggering spam flags
- Avoid misleading subjects: Ensure subject lines accurately reflect email content
4. Make Unsubscribing Easy
- Prominent unsubscribe link: Place it where it’s easy to find
- One-click unsubscribe: Don’t require logins or multiple steps
- Honor preferences: Process unsubscribe requests immediately
- Preference center: Offer frequency or content type options as alternatives to unsubscribing
Reducing Hard Bounce Rates
Hard bounces indicate permanent delivery failures, often due to invalid addresses.
They’re a key metric email providers use to judge your list management practices.
1. Improve Data Collection
- Validate at point of entry: Use real-time email validation services on signup forms
- Eliminate typo domains: Check for common misspellings of popular domains
- Reduce form fields: Fewer fields typically means fewer errors
- Use confirmed opt-in: Ensure the address is valid before adding to marketing lists
2. Regular List Maintenance
- Implement sunset policies: Remove subscribers who haven’t engaged in 6-12 months
- Gradual re-engagement: Before removing, try a targeted re-engagement campaign
- Quarterly list cleaning: Regularly verify emails using validation services
- Process bounces immediately: Remove hard bounces after a single occurrence
3. Avoid Risky Acquisition Practices
- Never purchase lists: Bought lists typically have high bounce rates
- Be cautious with list imports: Validate any imported lists before sending
- Audit trade show leads: Verify emails collected at events before bulk sending
- Review co-marketing campaigns: Ensure partners follow similar data quality standards
4. Technical Best Practices
- Properly format email addresses: Ensure your forms handle special characters correctly
- Monitor bounce categories: Review bounce reasons to identify patterns
- Update contact records: Have processes to update changed email addresses
- Test before sending: Send to a small, verified subset before full campaigns
Implementation Plan
- Baseline assessment:
- Document current spam complaint and bounce rates
- Identify campaigns with the highest negative metrics
- Prioritize quick wins:
- Immediately remove hard bounces from your database
- Ensure unsubscribe links are prominent and functional
- Validate your most recently added contacts
- Develop ongoing processes:
- Create a standard operating procedure for list hygiene
- Establish maximum acceptable thresholds for both metrics
- Implement regular review cycles using HubSpot’s email health tool
- Monitor impact:
- Track changes in complaint and bounce rates after each intervention
- Compare metrics before and after implementing new practices
- Correlate improvements with inbox placement rates
By systematically addressing these two critical metrics, you’ll not only improve your email deliverability but also enhance engagement with your audience.
Check subject line for words or special characters that trigger spam filters
Your email subject line is the first thing both recipients and spam filters evaluate.
Even with perfect authentication and a pristine sender reputation, problematic subject lines can trigger spam filters and prevent inbox delivery.
Let’s explore how to craft subject lines that pass spam filter checks while still engaging your audience.
Common Subject Line Triggers to Avoid
1. Spammy Words and Phrases
Certain words and phrases are frequently associated with spam and may trigger filters:
Financial promises:
- “Get rich quick”
- “Make money fast”
- “Free investment”
- “Million dollar”
- “Increase sales/income/revenue”
Urgency and pressure tactics:
- “Act now”
- “Limited time”
- “Before it’s too late”
- “Once in a lifetime”
- “Last chance”
Overly promotional language:
- “Free”
- “Guaranteed”
- “No risk”
- “100% satisfied”
- “All natural”
Unrealistic claims:
- “Lose weight fast”
- “Miracle cure”
- “Revolutionary breakthrough”
- “Secret revealed”
- “Amazing”
2. Problematic Formatting Elements
Beyond words, certain formatting choices can trigger spam filters:
- ALL CAPS: Using all capital letters (e.g., “FREE OFFER TODAY”)
- Excessive punctuation: Multiple exclamation points or question marks (e.g., “Don’t miss this!!!”)
- Special characters: Overuse of symbols like $, %, !, ?, etc.
- Repetitive patterns: Repeating the same character (e.g., “S-A-L-E”)
- Unusual spacing: Adding extra spaces to disguise trigger words
3. Subject Line Testing Tools
Before sending your campaigns, use these tools to evaluate your subject lines:
- SpamAssassin Check: Online tools like Mail Tester can scan your subject line against SpamAssassin rules
- Subject Line Testers: Services like SubjectLine.com provide spam score assessments
- HubSpot’s Content Checker: Use HubSpot’s built-in content review tools to identify potential issues
Best Practices for Spam-Free Subject Lines
1. Create Clear, Honest Subject Lines
- Be straightforward: Clearly state what’s inside the email
- Deliver on promises: Ensure the email content matches the subject
- Use natural language: Write how you would speak to someone
- Be specific: Vague subject lines can seem suspicious
Examples of good subject lines:
- “Your February Newsletter: 5 Customer Success Stories”
- “Webinar Invitation: Marketing Automation Best Practices – Feb 15”
- “Your Order #12345 Has Shipped – Tracking Details Inside”
- “New Case Study: How Company X Increased Conversion by 27%”
2. Optimize Subject Line Structure
- Keep it concise: Aim for 40-60 characters (6-10 words)
- Front-load important information: Put key details at the beginning
- Use personalization thoughtfully: Include the recipient’s name or company when relevant
- Test different approaches: A/B test subject lines to see what resonates without triggering filters
3. Develop a Subject Line Review Process
Create a checklist for your team to review subject lines before sending:
- Scan for spam trigger words and replace with alternatives
- Check for excessive punctuation or unusual formatting
- Ensure alignment between subject line and email content
- Verify personalization tokens are working correctly
- Run through a spam filter test tool before final approval
Effective Alternatives to Spammy Language
Instead of using phrases that might trigger spam filters, try these alternatives:
| Avoid | Use Instead |
|---|---|
| “Free offer” | “Complimentary resource” |
| “Act now!” | “Limited availability” |
| “Don’t miss out!!!” | “Opportunity ends soon” |
| “AMAZING DEAL” | “Special offer for subscribers” |
| “Guaranteed results” | “Proven approach” |
Monitor Impact on Deliverability
After implementing subject line best practices:
- Track open rates before and after making changes
- Check inbox placement using seed list testing
- Monitor spam placement rates in Google Postmaster Tools
- Review HubSpot’s email health scores for improvements
Remember that what works in one industry might not work in another.
Pay attention to your specific audience’s engagement patterns and adjust accordingly.
The goal is to create subject lines that not only pass spam filters but also genuinely engage your recipients and encourage them to open your emails.
By applying these subject line best practices, you’ll significantly reduce the risk of triggering spam filters while potentially improving your open rates—a win-win for your email marketing efforts.
Check content for words, images or links that trigger spam filters
While subject lines create the first impression, your email’s content is equally important for deliverability.
Modern spam filters analyze the entire email to determine if it belongs in the inbox or spam folder.
Let’s explore how to optimize your email content to avoid triggering these sophisticated filters.
Text Content Optimization
1. Avoid Spam-Triggering Language
Similar to subject lines, certain words and phrases in your email body can raise red flags:
Financial terminology to use cautiously:
- “No fees,” “Free access,” “No purchase necessary”
- “Money-back guarantee,” “100% free”
- “No hidden costs,” “Billion,” “Million”
Health claims to rephrase:
- “Lose weight,” “Fast weight loss,” “Diet”
- “No medical exam,” “Cure,” “Miracle”
- “Risk-free,” “No prescription needed”
Marketing phrases to reconsider:
- “Limited time offer,” “While supplies last”
- “Call now,” “Apply now,” “Click here”
- “Best price,” “Bargain,” “Discount”
Text formatting to avoid:
- Excessive bold, italics, or underlined text
- Colored text, especially red or green
- Too many exclamation points
- Overuse of capital letters
2. Balance Text and Code
Spam filters analyze the ratio of text to HTML code. Heavy code with minimal visible text often triggers suspicion:
- Aim for at least 60% text to 40% code
- Avoid embedding important message content in images
- Use a clean, simple HTML structure
Image Best Practices
Images are essential for engaging emails but can trigger spam filters if not properly implemented:
1. Optimize Image Usage
- Maintain a balanced image-to-text ratio: Aim for no more than 50% of your email being images
- Avoid image-only emails: Always include meaningful text content
- Use proper file formats: Stick to JPG, PNG, and GIF formats
- Optimize image sizes: Keep individual images under 200KB
- Host images on reliable servers: Use HubSpot’s hosting or other reputable image hosting
2. Image Attributes for Accessibility and Deliverability
- Always include alt text: Describe images meaningfully for accessibility
- Specify dimensions: Include width and height attributes
- Use descriptive filenames: Name images logically (e.g., “quarterly-report-graph.jpg” not “img001.jpg”)
- Avoid suspicious terms in image attributes: Don’t include spam trigger words in filenames or alt text
Link Safety and Structure
Links are essential but potentially problematic for deliverability:
1. Link Quantity and Quality
- Limit the number of links: Keep total links under 15-20 per email
- Avoid shorteners: Use full URLs instead of link shorteners when possible
- Include text links: Don’t rely solely on button or image links
- Ensure destinations are reputable: Link only to established, secure websites
- Check for blacklisted domains: Verify none of your links point to blacklisted sites
2. Link Formatting
- Make links visible: Ensure link text is clearly distinguishable
- Use descriptive anchor text: “Learn about our services” is better than “Click here”
- Avoid misleading hyperlinks: Make sure link text accurately describes the destination
- Check for broken links: Test all links before sending
Technical Content Considerations
1. Code Quality
- Use clean, standard HTML: Avoid obsolete or non-standard tags
- Properly close all tags: Ensure HTML is well-formed
- Minimize JavaScript: Most email clients block it anyway
- Test rendering across clients: Verify your email displays properly in major email clients
2. Spam Filter Testing
Before sending any campaign, test your content:
- Use HubSpot’s built-in spam filter checking tools
- Try third-party services like Email on Acid or Litmus
- Send test emails to accounts with different providers (Gmail, Outlook, Yahoo)
- Review spam scores and make adjustments as needed
Implementation Checklist
To ensure your content passes spam filter checks:
- Create a pre-send content review process:
- Scan for spam trigger words and phrases
- Check image-to-text and link-to-text ratios
- Verify all links lead to reputable destinations
- Ensure proper image implementation with alt text
- Develop a content style guide:
- List approved and prohibited words/phrases
- Define standards for links and images
- Set guidelines for formatting and structure
- Test before sending:
- Use HubSpot’s testing tools
- Send test emails to seed addresses
- Review spam filter scores
By methodically addressing these content elements, you’ll significantly reduce the risk of spam filter triggers while creating more effective, engaging emails.
Check image-to-text and link-to-text ratio
The balance between text, images, and links in your emails plays a crucial role in deliverability.
Email providers are increasingly sophisticated in analyzing these ratios to identify potential spam.
Let’s explore how to achieve the optimal balance to improve your inbox placement.
Why Image-to-Text Ratio Matters
Spam filters are suspicious of emails that rely heavily on images with minimal text for several reasons:
- Spam tactic detection: Spammers historically used image-heavy emails to hide suspicious content from text-based filters
- Accessibility concerns: Image-dominant emails are less accessible to users with visual impairments
- Content evaluation: Text allows spam filters to evaluate the legitimacy of your message
Achieve the Optimal Image-to-Text Balance
1. Follow the 60:40 Rule
A good rule of thumb is to maintain at least 60% text to 40% images in your email campaigns.
How to calculate your ratio:
- Estimate the vertical space occupied by images versus text
- Consider the file size of your email (text components are typically much smaller than images)
- Use email testing tools to evaluate your ratio objectively
2. Image Implementation Best Practices
- Break up large images: Instead of one large image, use smaller images interspersed with text
- Never send image-only emails: Always include substantial text content
- Avoid embedding critical information in images: Key messages, calls-to-action, and important details should appear in text form
- Consider mobile rendering: Image-heavy emails may load slowly on mobile devices
3. Text Alternatives for Image-Heavy Designs
If your brand aesthetic requires visual emphasis, consider these alternatives:
- Background images with text overlays: Use HTML text over background images
- CSS styling for text: Create visually appealing text without relying on images
- Responsive design: Implement media queries to adjust image display on different devices
- Progressive disclosure: Include summaries in text with “read more” options for detailed content
Link-to-Text Ratio Optimization
The number and presentation of links in your email can also impact deliverability:
1. Recommended Link Density
Most deliverability experts suggest:
- No more than 1 link per 100 words of text
- Maximum of 15-20 total links per email
- At least 1-2 paragraphs of text between link clusters
2. Link Implementation Best Practices
- Use descriptive anchor text: Instead of “click here,” use descriptive text like “Download our 2025 Industry Report”
- Avoid linking entire paragraphs: Keep link text concise and specific
- Vary your link destinations: Multiple links to the same URL may appear suspicious
- Include plain-text URLs: Occasionally include visible URLs rather than hiding all links behind anchor text
- Ensure all domains are reputable: Links to questionable domains can impact deliverability
3. Testing Your Link Profile
Before sending, test your email’s link profile:
- Review the total number of links
- Check for broken or redirecting links
- Verify all destinations are secure (HTTPS)
- Ensure none of your links point to blacklisted domains
Tools for Measuring and Testing Ratios
- Email testing services:
- Litmus: Provides spam testing including content analysis
- Email on Acid: Offers spam filter testing
- Mail Tester: Evaluates content and provides spam scores
- HubSpot’s built-in tools:
- Content optimizer suggestions
- Spam filter testing features
- Email preview functionality across devices
Implementation Strategy
- Audit your recent campaigns:
- Analyze your highest and lowest performing emails
- Identify patterns in image and link usage
- Note any correlation between ratio imbalances and poor deliverability
- Create templates with proper ratios:
- Design email templates that naturally maintain good text-to-image proportions
- Include appropriate spacing for text between images and links
- Consider modular designs that maintain balance even when customized
- Establish pre-send checks:
- Add ratio verification to your pre-send checklist
- Test emails across multiple devices and clients
- Have a non-designer review emails for text sufficiency
By optimizing your image-to-text and link-to-text ratios, you’re addressing a critical aspect of modern spam filtering.
These adjustments not only improve deliverability but often enhance user experience as well, creating emails that load quickly, render properly across devices, and provide accessible content to all recipients.
Verify if descriptive image alt tags are present
Image alt tags (alternative text) are often overlooked in email deliverability discussions, but they serve multiple important functions that can directly impact whether your emails reach the inbox.
Let’s explore why alt tags matter for deliverability and how to optimize them in your HubSpot emails.
Why Image Alt Tags Matter for Deliverability
Alt tags contribute to email deliverability in several ways:
- Spam filter evaluation: Spam filters analyze alt text to assess email content quality and relevance
- Text-to-image ratio improvement: Alt text counts toward the text content of your email, improving your overall text-to-image ratio
- Accessibility signals: Properly implemented alt tags signal legitimate sender behavior (spammers rarely bother with accessibility)
- Email client compatibility: When images are blocked (the default in many email clients), alt text ensures your message still communicates effectively
Audit Alt Tags in Your HubSpot Emails
Before creating new emails, review your existing templates and recent campaigns:
- Open recent email campaigns in HubSpot’s email editor
- Check each image to verify alt text is present and descriptive
- Note any patterns of missing or inadequate alt tags
Best Practices for Email Alt Tags
1. Write Descriptive, Relevant Alt Text
- Be specific and concise: Aim for 5-15 words that accurately describe the image
- Include context: Explain why the image matters in relation to surrounding content
- Incorporate relevant keywords: Naturally include 1-2 keywords where appropriate
- Avoid keyword stuffing: Never force keywords into alt text unnaturally
2. Format Alt Text Properly
- Use proper HTML syntax:
alt="Your descriptive text here" - Avoid quotes within alt text: Use single quotes for the attribute if your alt text needs double quotes
- Keep length reasonable: Most screen readers cut off alt text after about 125 characters
- Don’t include “image of” or “picture of”: Screen readers already announce the element as an image
3. Different Approaches for Different Image Types
For functional images (like buttons):
- Describe the action:
alt="Download our 2025 industry report"
For decorative images:
- Use empty alt text:
alt=""(not missing alt text, but deliberately empty)
For infographics or charts:
- Summarize the key data:
alt="Graph showing 42% improvement in deliverability rates after authentication"
For product images:
- Include key details:
alt="Blue wireless headphones with noise cancellation"
4. Avoid Common Alt Text Mistakes
- Missing alt attributes: Every image must have an alt attribute
- Generic descriptions: “Banner” or “Image” provides no value
- Filename as alt text: “header_image.jpg” is not helpful alt text
- Redundant information: Don’t repeat exact text that appears near the image
- Special characters: Avoid non-standard characters that might render poorly
Implement Alt Tags in HubSpot
HubSpot makes it easy to add and manage alt tags:
- In the email editor, select any image
- Look for the “Alt text” field in the editing panel
- Enter appropriate descriptive text
- Save your changes
Verification Process Before Sending
Before sending any campaign, implement this alt tag verification process:
- Complete pre-send checklist:
- Verify every image has appropriate alt text
- Check that alt text is descriptive and relevant
- Ensure no placeholder alt text remains
- Test with images disabled:
- Send a test email to yourself
- Disable images in your email client
- Verify the message remains comprehensible
- Run an accessibility check:
- Use HubSpot’s accessibility features
- Ensure alt text follows best practices
- Verify text alternatives for all non-text content
Impact Measurement
After implementing thorough alt tag practices, monitor:
- Improvement in deliverability rates
- Changes in spam filter assessments
- Feedback from accessibility testing
- Performance with image blocking enabled
By paying careful attention to image alt tags, you’re addressing an often-overlooked aspect of email deliverability while simultaneously improving accessibility for all recipients.
Perform a test and see where it goes
By sending test emails and tracking where they land, you can gather concrete data about your current deliverability status and identify specific problems to address.
Let’s explore how to effectively test your HubSpot emails for deliverability.
Set up Comprehensive Seed Testing
Seed testing involves sending your emails to a predetermined set of email addresses across different providers to see where they land (inbox, promotions, spam, etc.).
1. Create a Diverse Seed List
Build a list of test email addresses that includes:
- Major providers: Gmail, Yahoo, Outlook.com, AOL
- Business domains: Microsoft 365, Google Workspace
- Regional providers: Specific to your target audience locations
- Different devices: Mobile and desktop clients
You can create these accounts yourself or use professional seed testing services like:
2. Prepare Your Test Campaign
- Create a representative email:
- Use typical content, formatting, and design
- Include your normal number of images and links
- Use standard subject line practices
- Set up tracking:
- Enable HubSpot’s email tracking features
- Add UTM parameters to links for detailed click tracking
- Consider adding unique identifiers for each seed address
Conducting the Test
1. Basic Inbox Placement Testing
- Send your test email to your seed list
- Check where the email landed for each recipient:
- Primary inbox
- Promotions tab (Gmail)
- Updates tab (Gmail)
- Spam/junk folder
- Not delivered (bounced)
- Document the results in a spreadsheet with columns for:
- Email provider
- Placement location
- Delivery time
- Any errors or warnings
2. Advanced Testing with Professional Tools
For more detailed insights, consider using dedicated deliverability testing tools:
- GlockApps:
- Provides detailed placement reports across multiple providers
- Checks against common spam filters
- Gives specific recommendations based on results
- Emailable or Email on Acid:
- Offers comprehensive spam testing
- Analyzes technical aspects like authentication
- Provides rendering previews across different clients
3. Analyze Authentication Status
Verify that your emails are passing authentication checks:
- SPF check:
- Examine email headers for
spf=passorspf=fail
- Examine email headers for
- DKIM verification:
- Look for
dkim=passin the headers
- Look for
- DMARC compliance:
- Check if your email passes DMARC
Interpreting Test Results
1. Identify Patterns in Placement
Look for patterns that can point to specific issues:
- Spam placement across all providers: Likely content or reputation issue
- Spam in specific providers only: Provider-specific issues or domain reputation problems
- Promotions tab placement: Content appears promotional but not spammy
- Inconsistent delivery times: Possible throttling or IP reputation issues
2. Analyze Email Headers
Email headers contain valuable diagnostic information:
- Access the full headers of delivered test emails
- Look for specific spam-related feedback:
- SpamAssassin scores
- Authentication results
- Delivery path information
- Any warning messages
3. Correlate with HubSpot Analytics
Compare test results with HubSpot’s native analytics:
- Review open rates across different domains
- Check for unusual patterns in click behavior
- Note any correlation between authentication failures and poor performance
Taking Action Based on Test Results
1. Address Provider-Specific Issues
If you notice problems with specific providers:
- Gmail issues: Focus on engagement metrics and authentication
- Yahoo/AOL issues: Ensure strict authentication compliance
- Outlook issues: Check content for Microsoft-specific triggers
2. Create an Implementation Plan
Prioritize fixes based on impact:
- Critical fixes:
- Authentication failures
- Blacklisted sending domains or IPs
- High spam placement rates
- Secondary improvements:
- Content optimizations
- Template redesigns
- Engagement strategy adjustments
3. Retest After Changes
Implement a regular testing schedule:
- Test immediately after making significant changes
- Conduct routine tests before major campaigns
- Schedule monthly seed tests to monitor trends
DIY vs. Professional Testing Services
DIY approach (best for smaller operations):
- Create your own seed list with free email accounts
- Manually check placement across accounts
- Use free header analysis tools
Professional services (recommended for larger senders):
- Provide access to hundreds of seed accounts
- Offer automated reporting and analysis
- Include specific recommendations based on results
- Range from $50-300 per month depending on features
By implementing a systematic testing approach, you’ll gain actionable insights into your current deliverability status and clear direction on what needs to be fixed.
Repair poor domain reputation with InboxAlly
If you’ve implemented all the technical fixes and best practices but still struggle with deliverability issues, your domain reputation might be damaged.
Checking your domain reputation report in Google Postmaster Tools will confirm this.
Repairing a poor sender reputation is challenging but possible with the right approach.
InboxAlly.com offers a tool to help rehabilitate damaged sender reputations for HubSpot users.
Understanding Domain Reputation Repair
Domain reputation is how email providers judge the trustworthiness of your sending domain based on historical sending patterns, recipient engagement, and complaint rates.
When damaged, it can take months to repair naturally.
Email warm up tools like InboxAlly can accelerate this process.
Set up InboxAlly with HubSpot
- Sign up for InboxAlly:
- Visit InboxAlly.com
- Select a plan appropriate for your sending volume (typically 5% of your subscriber list)
- Complete the checkout process
- Connect with HubSpot:
- Set up your Sender Email
- Set up your Sender Profile
- Download and import their seed list to Hubspot
- Start the repair process:
- Clone one of your previous campiagns
- Send a warmup campaign to the InboxAlly seed list
- Do this every day for the next 4 weeks
- Use a slightly different subject line each day
Measure Reputation Improvement
Track these key metrics to gauge progress:
- Inbox placement rate: The percentage of emails reaching the inbox (should increase)
- Spam placement rate: The percentage landing in spam folders (should decrease)
- Open rate trends: Should show gradual improvement as reputation repairs
Alternative and Complementary Approaches
While InboxAlly can be effective, consider these additional strategies:
- IP address rotation: If available through HubSpot, request changes to your IP pool
- Domain change (extreme cases): In severe situations, consider a fresh subdomain
- Deliverability consulting: Work with a specialized email deliverability consultant
- Engagement campaigns: Run dedicated campaigns to re-engage inactive subscribers
Cost-Benefit Analysis
InboxAlly services typically cost:
- $150-$650/month for small to medium senders
- $1200+/month for enterprise-level solutions
Consider the ROI based on:
- Current revenue loss from deliverability issues
- Time saved compared to manual reputation repair
- Improved campaign performance potential
Frequently Asked Questions
Why are my HubSpot emails suddenly going to spam?
Sudden deliverability problems typically stem from one of these issues:
Recent changes:
- Changes to your authentication setup
- New email templates or content strategies
- Shifts in sending volume or frequency
- List imports without proper verification
External factors:
- Updates to Gmail, Yahoo, or other provider algorithms
- Getting added to an email blocklist
- Reputation damage from shared IP pools
- Competitor spam complaints
Solution steps:
- Check if you’re on any blocklists using MXToolbox
- Verify your authentication records haven’t expired or been modified
- Review recent campaign content for potential spam triggers
- Check HubSpot’s email health tool for spikes in complaint or bounce rates
How long does it take to fix deliverability issues?
Timeframe expectations:
- Technical fixes (authentication, content): 1-7 days to implement, 1-2 weeks to see impact
- List quality issues: 2-4 weeks to clean lists and see improvements
- Reputation damage: 1-3 months for noticeable improvement, up to 6 months for full recovery
Factors affecting timeline:
- Severity of the existing issues
- Email volume and sending frequency
- Your audience’s engagement levels
- Provider-specific policies (Gmail vs. Yahoo vs. Outlook)
Does HubSpot offer dedicated IPs for better deliverability?
Yes, HubSpot offers dedicated IPs as an add-on service with these considerations:
Benefits:
- Complete control over your sending reputation
- Isolation from other senders’ practices
- Better deliverability monitoring and troubleshooting
Requirements:
- Additional cost (typically $500+/month)
- Regular sending volume (minimum 30,000 emails monthly recommended)
- Proper IP warming protocol
- Consistent sending patterns
Best for:
- Large volume senders
- Senders with strict deliverability requirements
- Organizations with the resources to manage dedicated infrastructure
What’s the difference between authentication and reputation?
Authentication verifies you are who you claim to be:
- Technical DNS setup (SPF, DKIM, DMARC)
- Binary outcome (passes or fails)
- Under your direct control
- One-time setup with occasional maintenance
- Prevents domain spoofing and impersonation
Reputation is how email providers judge your sending practices:
- Based on recipient engagement and actions
- Exists on a spectrum (excellent to poor)
- Built over time through consistent practices
- Requires ongoing maintenance
- Determines how providers prioritize your mail
Both are essential: Authentication gets you through the door, but reputation determines your welcome.
How do I know if my emails are being blocked or filtered?
Signs your emails are being blocked:
- High bounce rates with specific error messages
- Complete delivery failure to certain domains
- Blocklist notifications
- Zero opens from specific providers
Signs your emails are being filtered to spam:
- Normal delivery but unusually low open rates
- Engagement metrics that vary widely by provider
- Recipient reports of finding emails in spam
- Test emails landing in spam folders
Tools to confirm:
- HubSpot’s email health dashboard
- Seed testing with services like GlockApps
- Google Postmaster Tools for Gmail delivery
- Manual tests to different provider accounts
Should I purchase an email list to replace subscribers lost to spam issues?
Absolutely not. Purchased lists will worsen deliverability problems:
Why purchased lists damage deliverability:
- Contain outdated, invalid, or honeypot addresses
- Recipients never opted in to hear from you
- High likelihood of spam complaints
- Violate email provider policies and often laws like CAN-SPAM, GDPR, or CASL
- Violate HubSpot’s Terms of Service
Better alternatives:
- Create valuable content that encourages organic sign-ups
- Use lead magnets to grow your list legitimately
- Leverage social media to attract new subscribers
- Implement referral programs for existing subscribers
- Focus on re-engagement campaigns for inactive subscribers
Can the “Report Spam” button permanently damage my reputation?
Yes, spam reports have significant negative impact:
How spam reports affect reputation:
- Direct signal to email providers about unwanted content
- Just a few reports can affect thousands of future sends
- Impact is magnified for smaller senders
- Some providers share spam report data with others
- Recovery requires extended periods of clean sending
To minimize spam reports:
- Only email people who explicitly opted in
- Set clear expectations about content and frequency
- Make unsubscribing extremely easy
- Provide highly relevant, valuable content
- Segment your list for better targeting
What’s more important: open rate or inbox placement?
Both matter but in different ways:
Open rate:
- Measures recipient engagement
- Easier to track in HubSpot
- Affected by subject lines and sender recognition
- Can be artificially lowered by inbox placement issues
Inbox placement:
- Measures deliverability success
- Requires specialized testing to track accurately
- Prerequisite for any email to be opened
- Foundation of email marketing success
The relationship: Open rates are meaningless if emails aren’t reaching the inbox. Prioritize inbox placement first, then optimize for opens once deliverability is stable.
Do email deliverability services like InboxAlly really work?
The reality is nuanced:
Potential benefits:
- Access to specialized knowledge and tools
- Continuous monitoring beyond what HubSpot provides
- Specific, actionable recommendations
- Some offer proprietary technology to improve engagement signals
Limitations:
- No guaranteed results
- Can be expensive
- Still require you to implement best practices
- Effectiveness varies by provider and situation
Best candidates for these services:
- Senders with significant deliverability problems
- High-volume email marketers where ROI justifies the cost
- Organizations lacking in-house deliverability expertise
- Businesses where email is a primary revenue channel
Remember that while these services can be helpful, they’re not magic solutions. The foundation of good deliverability remains proper authentication, quality content, and engaged, permission-based lists.
Can I test my email deliverability without sending to my actual list?
Yes, through several methods:
Pre-send testing options:
- Seed testing with accounts you control
- Professional testing services like GlockApps or Litmus
- Spam filter testing tools
- Small segment testing before full campaigns
What to test:
- Inbox vs. spam placement
- Authentication
- Rendering across different email clients
- Mobile responsiveness
- Load time and size optimization
Benefits of pre-send testing:
- Identifies issues before they impact your audience
- Allows for corrections before reputation damage occurs
- Provides objective metrics on deliverability
- Creates a historical record for comparison
Remember, testing is not a one-time task but should become part of your regular email workflow. Even a 5-minute test before each campaign can save you from major deliverability headaches down the road.
