
Frustrated because your Mailchimp emails are going to spam? You’re not alone! Many businesses and marketers face this challenge, which can significantly impact the effectiveness of email campaigns and your bottom line.
In this comprehensive guide, I’ll walk you through a series of steps to help ensure your Mailchimp emails land in your subscribers’ inboxes rather than their spam folders.
Email deliverability is a complex issue, influenced by various factors such as domain authentication, sender reputation, and content quality.
By addressing these elements, you can dramatically improve your chances of avoiding the dreaded spam folder.
Whether you’re new to email marketing or a seasoned pro, this article will provide you with actionable strategies to fix the problem of Mailchimp emails going to spam.
Let’s dive in and explore the steps you can take to optimize your email deliverability and ensure your messages reach their intended audience.
Check current domain authentication records
Before making any changes, it’s crucial to understand your current domain authentication setup.
Our Check My Domain tool is an excellent resource for this purpose.
This free tool allows you to quickly assess your domain’s current authentication status.
To use the tool:
- Visit the HelloInbox homepage.
- Navigate to the Check My Domain tool.
- Enter your name, email address and domain name.
- Click the Check My Domain button.
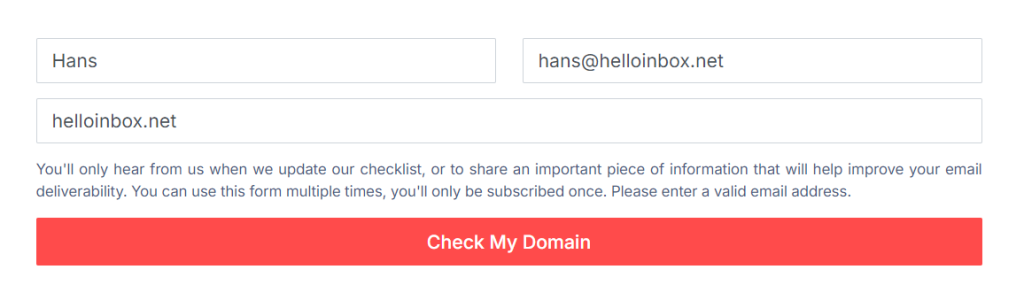
The tool will provide you with a report on your domain’s authentication records, including SPF, DKIM, and DMARC.
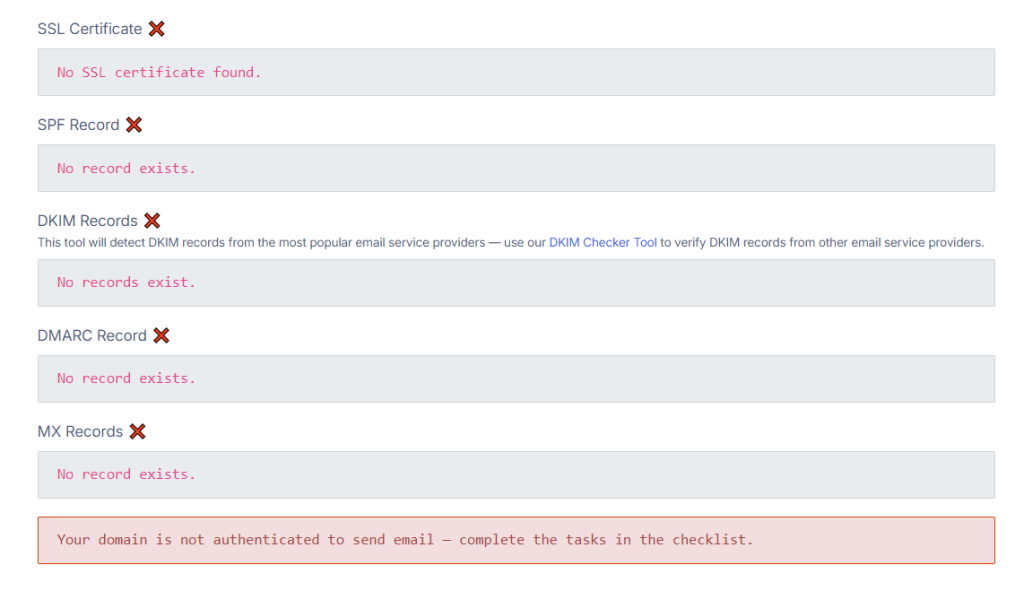
This information serves as a starting point for identifying areas that need improvement.
Pay close attention to any warnings or errors flagged by the tool.
These indicators highlight potential issues that could be affecting your email deliverability.
Armed with this knowledge, you’ll be better prepared to implement the necessary changes in the following steps.
In addition to checking your authentication records, our tool will present you with a comprehensive 39-step email deliverability checklist covering infrastructure, reputation, list quality, content quality and maintenance.
Set up SPF record for Mailchimp
Sender Policy Framework (SPF) is a crucial email authentication method that helps prevent email spoofing.
By setting up an SPF record for Mailchimp, you’re essentially telling receiving mail servers that Mailchimp is authorized to send emails on behalf of your domain.
This step is vital in reducing the likelihood of your Mailchimp emails going to spam.
To set up an SPF record for Mailchimp:
- Log in to your domain registrar or DNS provider.
- Locate the DNS management section.
- Look for an existing SPF record (TXT record type).
- If an SPF record exists, add Mailchimp’s SPF information to it.
- If no SPF record exists, create a new TXT record with the following value:
v=spf1 include:servers.mcsv.net ~all
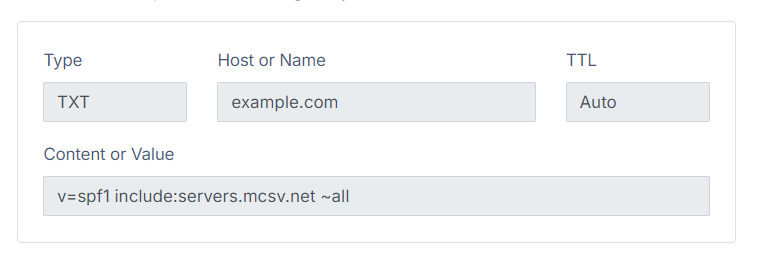
It’s important to note that if you’re using multiple email service providers, you’ll need to include them all in a single SPF record.
For example, if your business is using Google Workspace (Gmail) as your mail provider:
v=spf1 include:_spf.google.com include:servers.mcsv.net ~all
After making these changes, allow some time for the DNS changes to propagate, which can take up to 48 hours.
Once propagated, this SPF record will help authenticate your Mailchimp emails and reduce the chances of them going to spam.
Set up Domain Authentication (DKIM) records for Mailchimp
DomainKeys Identified Mail (DKIM) is another crucial email authentication method that works alongside SPF to verify the authenticity of your emails.
By setting up DKIM records for Mailchimp, you’re adding a digital signature to your emails that receiving servers can verify.
This step is essential in preventing your Mailchimp emails from going to spam.
To set up DKIM records for Mailchimp:
- Log in to your Mailchimp account.
- Click your profile icon and choose Account.
- Click Domains.
- Click Start Authentication next to the verified email domain you want to work with.
- Follow these steps to authenticate your domain.
- Choose your domain provider from the dropdown and click Next. If your service or software is not listed, choose Other.
- In a separate browser window or tab, navigate to your domain provider’s website and find your domain’s records. Depending on your service, we’ll provide guidance on where to find them. After you find your domain’s records, navigate back to Mailchimp and click Next.
- Follow the instructions for creating new CNAME records. Copy the values for your new records and paste them into the appropriate fields for your domain. These values will be customized for your domain and the service you are using.
Typically, you’ll need to add three CNAME records for Mailchimp.
The exact values will be provided by Mailchimp and will be unique to your account.
Here’s an example of what these records might look like:
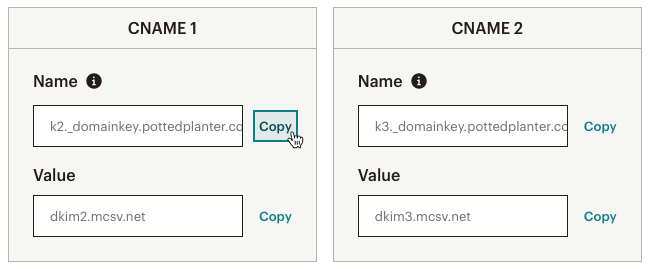
After adding these records, return to your Mailchimp account and click Next to verify the domain.
Mailchimp will check if the records have been properly set up.
Remember that DNS changes can take up to 48 hours to propagate fully.
When authentication is successful, you’ll see the Authenticated label next to the domain on the Domains page in your account.

By implementing domain authentication (DKIM), you’re adding another layer of authentication to your emails, further reducing the risk of your Mailchimp emails going to spam and improving overall deliverability.
Set up DMARC record and monitoring
Domain-based Message Authentication, Reporting, and Conformance (DMARC) is the final piece of the email authentication puzzle.
DMARC is a standard that prevents spammers from using your domain to send email without your permission — also known as spoofing.
It builds upon SPF and DKIM to provide clear instructions to receiving mail servers on how to handle emails that fail authentication checks.
If you’re setting up DMARC for the first time, I recommend setting a policy of p=none and collecting aggregate data with a DMARC monitoring service.
You can then monitor reports and slowly bring your domain into compliance over time.
This initial DMARC policy (p=none) won’t affect the delivery of your emails but will provide you with reports on email authentication results.
As you gain confidence in your email authentication setup, you can gradually enforce a stricter DMARC policy. You can read more about the DMARC compliance process here.
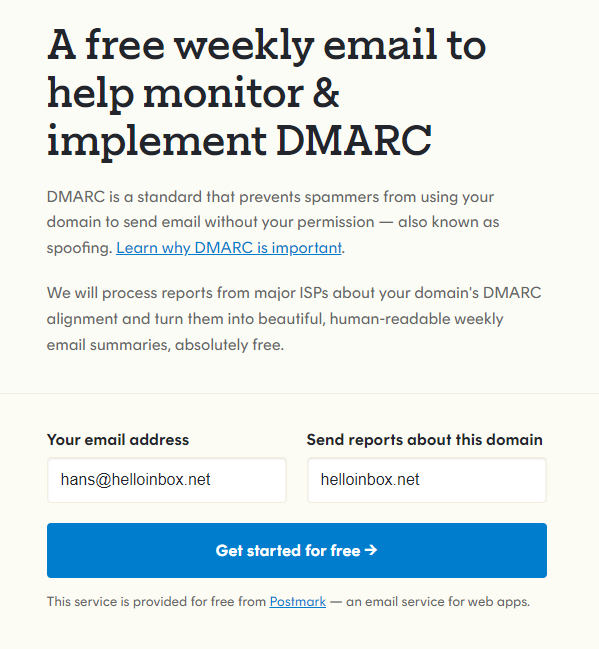
To monitor your DMARC reports for free, you can use the free service provided by Postmark:
- Visit https://dmarc.postmarkapp.com/
- Enter the email address to receive your weekly reports.
- Enter the domain name you want to monitor.
- Click the Get started for free button.
- Update your DMARC record to send reports to the provided email address
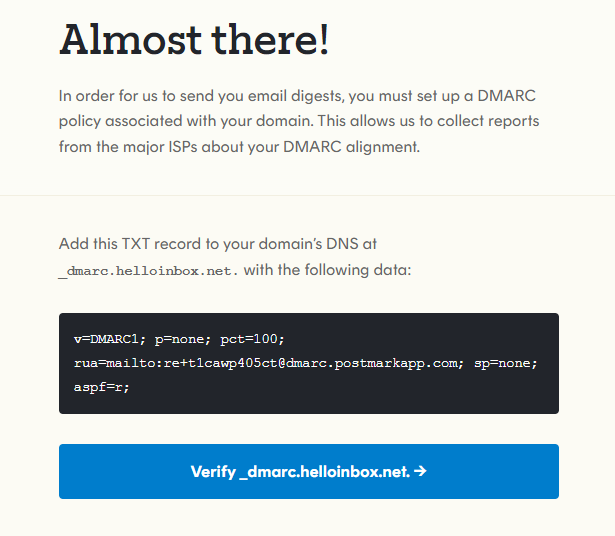
Once you verify the DMARC record, you’ll begin receiving a report every Monday morning.
This information is invaluable for identifying all 3rd-party mail providers sending emails on your behalf, and identifying sources that are not authorized to send emails on your behalf.
Add your domain to Google Postmaster Tools
Google Postmaster Tools is a free service provided by Google that offers valuable insights into how Gmail users interact with emails from your domain.
By adding your domain to Google Postmaster Tools, you gain access to data that can help you understand and address issues causing your Mailchimp emails to go to spam.
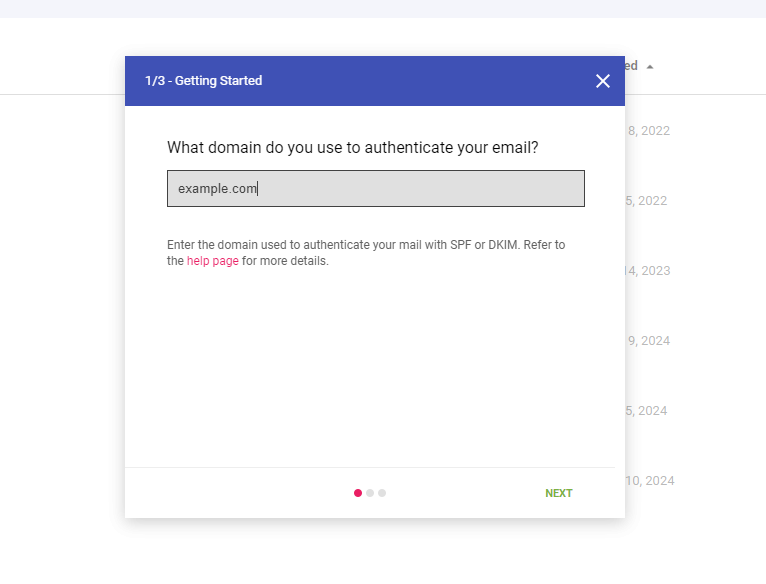
To add your domain to Google Postmaster Tools:
- Visit postmaster.google.com
- Sign in with a Google account.
- Click on the red circle button to add a new domain.
- Enter your domain name.
- Verify ownership by adding a TXT record to your DNS.
Once your domain is verified, you’ll have access to various reports that can help you diagnose and fix deliverability issues.
These reports include information on domain reputation, IP reputation, spam rate and delivery errors.
By regularly checking these reports, you can quickly identify if there are any sudden changes or issues affecting your email deliverability.
This proactive approach can help you address problems before they significantly impact your email campaigns and prevent your Mailchimp emails from going to spam.
Check Domain Reputation, Spam Rate and Delivery Error reports
Now that you’ve set up Google Postmaster Tools, it’s time to dive into the wealth of information it provides.
Regularly checking these reports is crucial for maintaining good email deliverability and preventing your Mailchimp emails from going to spam.
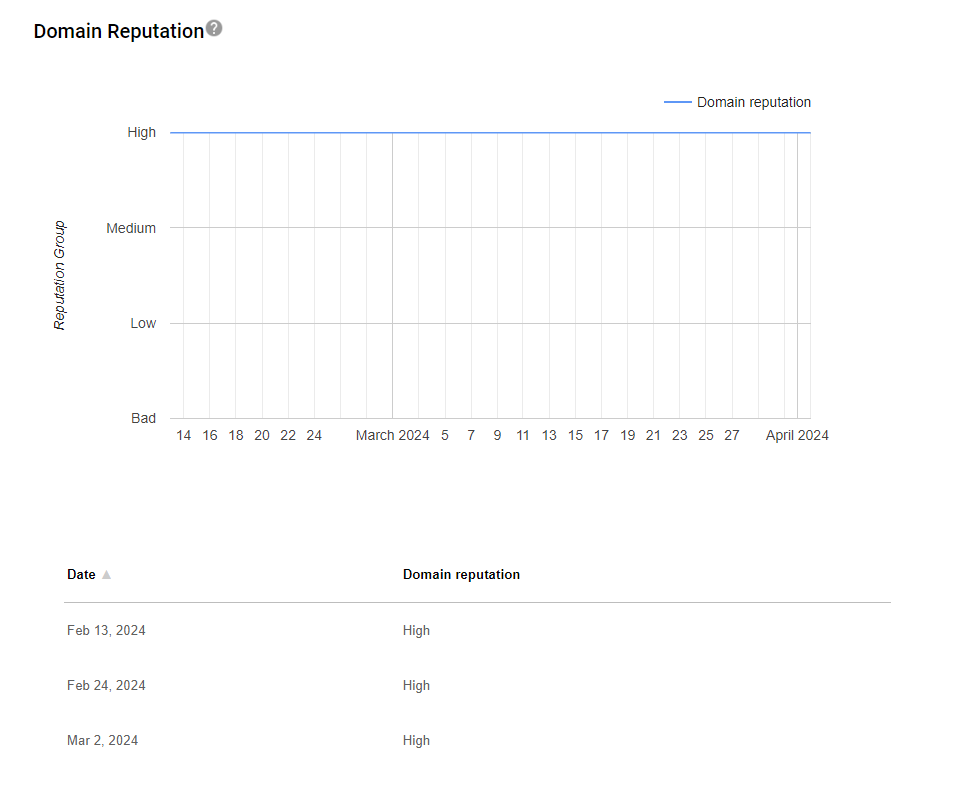
Domain Reputation Report
This report shows how Gmail views your domain’s reputation, ranging from “Bad” to “High”. A “Low” or “Bad” reputation indicates most or all of your emails are currently landing in the Gmail spam folder.
A High reputation is essential for inbox placement.
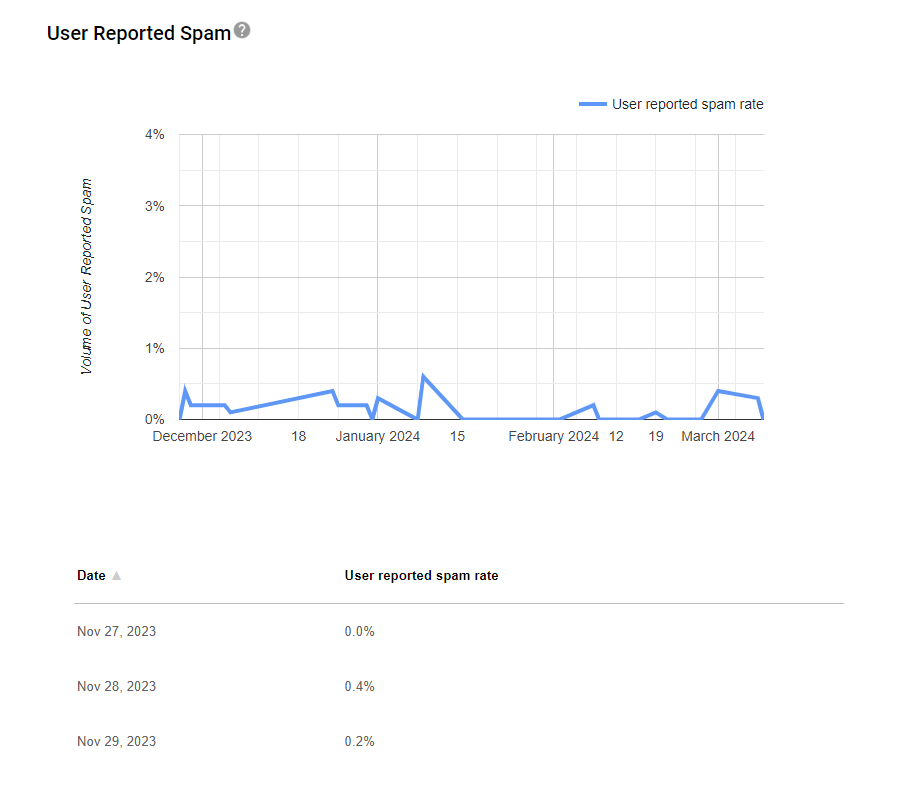
Spam Rate Report
This report indicates the percentage of your emails that recipients mark as spam.
A high spam rate can severely impact your deliverability.
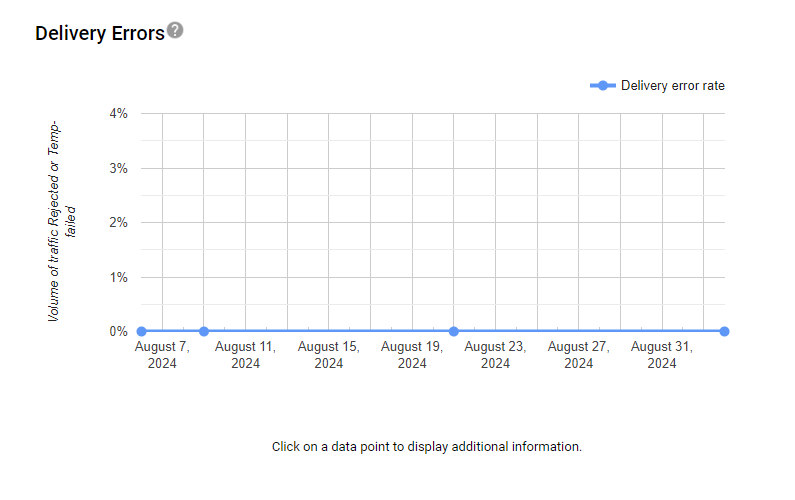
Delivery Errors Report
This report shows temporary and permanent errors encountered when delivering emails to Gmail users.
To interpret these reports:
- Look for any sudden changes in domain reputation or spam rate
- Pay attention to spikes in delivery errors
- Compare the data with your Mailchimp campaign performance
If you notice negative trends, it’s time to take action.
This might involve improving your email content, cleaning your email list, or adjusting your sending frequency.
Remember, maintaining a good sender reputation is key to keeping your Mailchimp emails out of the spam folder.
Check sending IP address reputation
The reputation of the IP address used to send your emails plays a crucial role in deliverability.
When using Mailchimp, you’re likely sharing IP addresses with other senders, which means their practices can potentially affect your reputation.
Checking your sending IP reputation is an important step in diagnosing why your Mailchimp emails might be going to spam.
To check your sending IP reputation:
- Perform a test with Mail-Tester.com
- Toggle the section titled You’re properly (or not) authenticated.
- Look for the IP address.
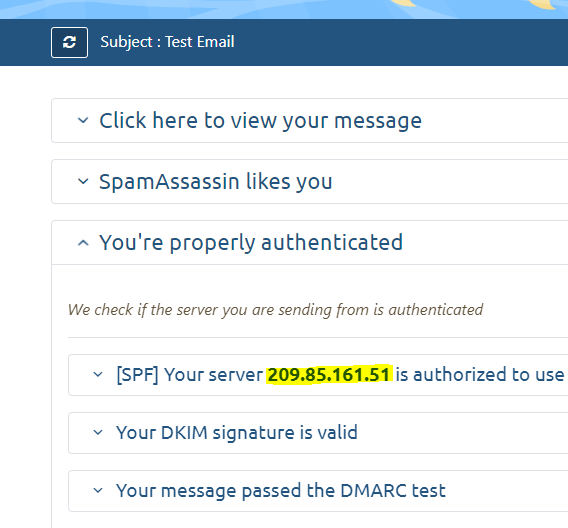
Once you have the IP address, you can check its reputation using various online tools:
If you find that your sending IP has a poor reputation, it could be contributing to your Mailchimp emails going to spam.
In this case, you might want to consider:
- Contacting Mailchimp support to discuss the issue
- Upgrading to a dedicated IP address if you send a high volume of emails
- Implementing a proper IP warm-up process if you switch to a new IP
Check Spam Complaint and Hard Bounce rate in Mailchimp
Monitoring your Spam Complaint and Hard Bounce rates in Mailchimp is crucial for maintaining good email deliverability.
High rates in either of these metrics can significantly increase the likelihood of your Mailchimp emails going to spam.
To check these rates in Mailchimp:
- Log in to your Mailchimp account.
- Navigate to the Reports section.
- Select a recent campaign.
- Look for the “Bounced” and “Abuse Reports” metrics.
Interpreting the results:
- Spam Complaint Rate: This is the percentage of recipients who marked your email as spam. A rate above 0.1% is concerning and requires immediate attention.
- Hard Bounce Rate: This represents emails that couldn’t be delivered due to permanent reasons (e.g., invalid email addresses). A rate above 2% is generally considered high.
If you notice high rates in either of these metrics, it’s a clear sign that you need to take action to improve your email practices.
How to reduce Spam Complaint and Hard Bounce rate
Reducing your Spam Complaint and Hard Bounce rates is crucial for maintaining good deliverability and preventing your Mailchimp emails from going to spam.
Here are some strategies to help you improve these metrics:
Clean your email list regularly
- Remove inactive subscribers
- Verify email addresses using an email validation service
- Implement double opt-in for new subscribers
Segment your audience
- Send targeted content based on subscriber interests
- Use engagement-based segmentation to identify active subscribers
Improve your email content
- Provide valuable, relevant content
- Use clear and honest subject lines
- Include an easy-to-find unsubscribe link
Optimize your sending frequency
- Avoid overwhelming subscribers with too many emails
- Consider letting subscribers choose their preferred email frequency
Use re-engagement campaigns
- Attempt to re-engage inactive subscribers before removing them
Monitor your sender reputation
- Regularly check your domain and IP reputation
- Address any issues promptly
Educate your subscribers
- Ask them to add your email address to their contact list
- Provide instructions on how to move your emails from spam to inbox
By implementing these strategies, you can significantly reduce your Spam Complaint and Hard Bounce rates.
Check subject line for words or special characters that trigger spam filters
Your email subject line is the first thing recipients and spam filters see.
Using certain words, phrases, or special characters can trigger spam filters, causing your Mailchimp emails to go to spam.
Here’s how to optimize your subject lines:
Avoid spam trigger words
- “Free”, “Guarantee”, “No obligation”
- “Click here”, “Order now”, “Limited time”
- Excessive use of “!”, “$”, or ALL CAPS
Use personalization wisely
- Incorporate the recipient’s name, but don’t overdo it
Keep it concise
- Aim for 40 characters or less
- Put the most important information at the beginning
Be specific and relevant
- Clearly indicate what the email is about
- Align the subject line with the email content
A/B test your subject lines
- Use Mailchimp’s A/B testing feature to compare different subject lines
Avoid excessive punctuation
- Don’t use multiple exclamation points or question marks
Steer clear of deceptive tactics
- Don’t use “Re:” or “Fwd:” unless it’s a genuine reply or forward
By following these guidelines, you can create subject lines that are both engaging for your subscribers and less likely to trigger spam filters.
Check content for words, images or links that trigger spam filters
The content of your email plays a crucial role in determining whether it lands in the inbox or the spam folder.
Spam filters analyze various elements of your email content to make this decision.
Here’s how to optimize your email content:
Avoid spam trigger words in the body
- “Buy now”, “Click here”, “Limited offer”
- “100% free”, “Guaranteed”, “No risk”
- Be cautious with words related to money, urgency, or too-good-to-be-true offers
Use proper HTML
- Ensure your HTML is clean and properly formatted
- Use inline CSS instead of external stylesheets
Be careful with images
- Don’t use too many images
- Avoid image-only emails
- Always include alt text for images
Mind your links
- Don’t use URL shorteners
- Avoid linking to suspicious or blacklisted domains
- Don’t hide links in images without text alternatives
Provide a plain-text version
Always include a plain-text alternative to your HTML email
Personalize content
Use merge tags to include the recipient’s name or other relevant information
Include proper email headers
Ensure your “From” name and email address are clear and consistent
Add an unsubscribe link
Make it easy for recipients to opt-out if they wish
By carefully crafting your email content with these guidelines in mind, you can significantly reduce the chances of your Mailchimp emails going to spam due to content-related issues.
Check image-to-text and link-to-text ratio
The balance between images, links, and text in your emails can significantly impact deliverability.
Spam filters often flag emails with an imbalanced ratio as potential spam.
Here’s how to optimize your image-to-text and link-to-text ratios:
Image-to-text ratio
- Aim for a 60:40 text-to-image ratio
- Avoid image-only emails
- Use images to complement your text, not replace it
Link-to-text ratio
- Keep your link density low (ideally less than 1 link per 100 words)
- Avoid multiple links to the same destination
- Use descriptive anchor text for links
Distribute content evenly
- Spread out images and links throughout the email
- Avoid clustering too many images or links in one area
Use background images cautiously
- Some email clients may not display background images
- Ensure your message is clear even without background images
Test across different email clients
- Use Mailchimp’s preview feature to see how your email looks in various clients
- Pay attention to how images and links render in different environments
Verify if descriptive image alt tags are present
Alt tags (alternative text) for images are crucial for several reasons, including accessibility and spam prevention.
Proper use of alt tags can help keep your Mailchimp emails from going to spam.
Here’s why alt tags are important and how to use them effectively:
Importance of alt tags
- Provide context when images don’t load
- Assist visually impaired recipients using screen readers
- Help spam filters understand your email content
How to write effective alt tags
- Be descriptive but concise
- Accurately represent the image content
- Include keywords naturally, but don’t keyword stuff
Implement alt tags in Mailchimp
- When inserting an image, fill out the “Alt” field
- For code view, use the format:
<img src="image.jpg" alt="Description of image">
Best practices
- Use unique alt text for each image
- Don’t start alt text with “Image of” or “Picture of”
- For decorative images, use empty alt text (alt=””)
Check your alt tags
- Review your email in plain text mode
- Ensure all important information is conveyed even without images
Perform a test and check where it goes
Before sending your campaign to your entire list, it’s crucial to perform thorough testing to ensure your emails aren’t going to spam.
Here’s a step-by-step guide to test your Mailchimp emails:
- Use Mailchimp’s inbox preview feature:
- This shows how your email appears in various email clients
- Send test emails to multiple email providers:
- Include Gmail, Outlook, Yahoo, and others
- Use both personal and business email addresses
- Check different devices and apps:
- Test on desktop, mobile, and tablet devices
- Check both native email apps and web-based clients
- Use spam testing tools:
- Mailchimp integrates with Inbox Preview and Litmus
- These tools can identify potential spam triggers
- Monitor test email placement:
- Check if test emails land in the inbox, promotions tab, or spam folder
- If they go to spam, review and adjust your content based on previous sections
- Test your authentication:
- Use tools like Mail-Tester.com to verify SPF, DKIM, and DMARC
- Ensure all authentication methods are properly set up
- Analyze your test results:
- Look for patterns in emails that go to spam
- Make necessary adjustments before sending to your full list
By thoroughly testing your emails before sending, you can identify and resolve issues that might cause your Mailchimp emails to go to spam.
Use a warmup and reputation repair service
If after following all the advice provided in this article, and you’re still consistently landing in the spam folder, using an email warmup and reputation repair service like InboxAlly.com can be an effective solution.
These services work by gradually increasing your sending volume and generating positive engagement signals.
Here’s how to use such a service:
- Understand email warmup:
- It’s the process of gradually increasing email volume to establish a good sender reputation
- Particularly useful for new domains or IP addresses
- How InboxAlly.com works:
- Automatically sends and receives emails from your domain
- Simulates real user behavior (opening, replying, marking as important)
- Gradually increases volume over time
- Setting up with InboxAlly.com:
- Sign up for an account
- Create a sender profile
- Download their seed list
- Start sending campaigns to their seed list of a daily basis
- Monitor progress:
- Track improvements in deliverability
- Observe changes in inbox placement rates
- Gradually transition to your full list:
- As your reputation improves, slowly increase sends to your actual subscribers
- Monitor engagement rates closely during this transition
By using a warmup and reputation repair service like InboxAlly.com, you can systematically improve your sender reputation and reduce the chances of your Mailchimp emails going to spam.
Frequently asked questions
To provide additional clarity, here are answers to some frequently asked questions:
Q: How long does it take to improve email deliverability?
A: Improving deliverability is an ongoing process. You might see initial improvements within a few weeks, but establishing a strong sender reputation can take several months of consistent good practices.
Q: Can using a free email domain (like Gmail or Yahoo) affect deliverability?
A: Yes, using a free email domain can negatively impact deliverability. It’s best to use a professional email address associated with your business domain.
Q: How often should I clean my email list?
A: It’s recommended to clean your list at least every six months. However, if you notice high bounce rates or low engagement, you may need to clean it more frequently.
Q: What’s a good open rate to aim for?
A: Open rates vary by industry, but generally, a rate above 20% is considered good. However, focus on improving your own rates over time rather than comparing to others.
Q: Can sending too frequently cause my emails to go to spam?
A: Yes, sending too frequently can lead to recipient fatigue and increase the likelihood of your emails being marked as spam. Find a balance that works for your audience.
Q: Should I remove subscribers who haven’t opened my emails in a while?
A: Before removing them, try a re-engagement campaign. If they still don’t engage, it’s best to remove them to maintain list quality.
Q: Can using certain words in the subject line guarantee my email won’t go to spam?
A: No single word or phrase can guarantee inbox placement. Focus on creating relevant, valuable content for your subscribers.
Q: How does the new iOS 15 privacy feature affect email open rates?
A: iOS 15’s Mail Privacy Protection can inflate open rates. Focus on other engagement metrics like clicks and conversions for a more accurate picture.
