Setting up SPF (Sender Policy Framework) and DKIM (DomainKeys Identified Mail) records is essential for Google Workspace users who want to improve email deliverability and security.
These settings help prevent email spoofing by verifying that the emails sent from your domain are authorized and have not been tampered with in transit.
This tutorial will guide you through the process of configuring SPF and DKIM records step-by-step, complete with expert tips and visual aids to ensure a smooth setup.
Step-by-Step Guide
Access Your Domain Host
- Log in to your domain host. This is typically where you purchased your domain (e.g., GoDaddy, Namecheap).
- Navigate to the area where DNS settings are managed. This could be labeled as “DNS Management,” “Name Server Management,” or similar.
Configure SPF Record
- Locate the TXT records section in your DNS management area.
- Add a new TXT record with the following details:
- Name/Host/Alias: Enter
@or leave it blank (this represents your domain). - Time to Live (TTL): 3600 or as recommended by your host.
- Value/Answer/Destination:
v=spf1 include:_spf.google.com ~all
- Name/Host/Alias: Enter
- Save the record. It may take up to 48 hours for DNS changes to propagate.

Enable DKIM in Google Workspace
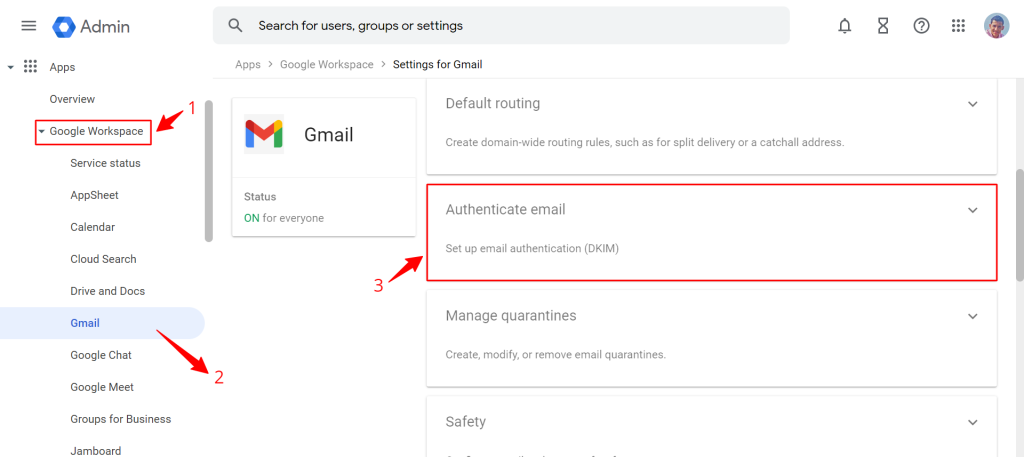
- Log in to your Google Admin console (admin.google.com).
- Go to Apps > Google Workspace > Gmail.
- Click on Authenticate email.
- Select your domain and click on Generate new record.
- Choose a DKIM key length (recommend 2048 bits for enhanced security).
- Click Generate.

Add DKIM Record to Your Domain’s DNS
- After generating the DKIM key in Google Workspace, you will receive a DKIM record.
- Return to your domain’s DNS settings and add a new TXT record:
- Name/Host/Alias: Enter the prefix provided by Google, typically
google._domainkey. - TTL: 3600 or as recommended by your host.
- Value: Paste the entire DKIM value provided by Google.
- Name/Host/Alias: Enter the prefix provided by Google, typically
- Save the record. Like SPF, it may take some time for this to propagate.

Expert Tips
- Verify records: Use our Check My Domain tool to verify that your SPF and DKIM records are correctly published.
- Regular updates: Keep your SPF and DKIM settings up to date, especially if there are changes in your email sending practices or using new third-party services.
- Monitor email performance: After setting up SPF and DKIM, monitor your email deliverability with Google Postmaster Tools and check for any issues that might arise.
Conclusion
By following these detailed steps, incorporating expert tips, and addressing common questions, you can effectively set up SPF and DKIM for your Google Workspace to enhance your organization’s email security and deliverability.
Frequently Asked Questions
What if I have multiple email service providers?
You can include multiple domains in your SPF record by adding additional include statements, like v=spf1 include:_spf.google.com include:otherdomain.com ~all.
How often should I update my DKIM key?
It’s recommended to rotate your DKIM keys annually or as per your organizational security policies.
Can setting up SPF and DKIM affect my email deliverability?
Yes, properly setting up SPF and DKIM can significantly improve your email deliverability by reducing the likelihood of your emails being marked as spam.
What should I do if my emails are still going to spam after setting up SPF and DKIM?
Ensure that your SPF and DKIM records are correct. Also, consider setting up DMARC (Domain-based Message Authentication, Reporting & Conformance) to further enhance email security and deliverability.
