For Salesforce users, ensuring that your carefully crafted emails actually reach your recipients’ inboxes—rather than being filtered into spam folders—is essential for maintaining effective communication and achieving your business goals.
This comprehensive guide will walk you through the steps of diagnosing and fixing Salesforce emails going to spam and help you maximize your email marketing efforts.
Table of Contents
- How Important is Salesforce Deliverability?
- Check Current Domain Authentication Records
- Set up SPF Record for Salesforce
- Set up Email Authentication in Salesforce
- Set up DMARC Record and Monitoring
- Add Your Domain to Google Postmaster Tools
- Check Domain Reputation and Spam Rate Reports in Google Postmaster Tools
- Check Salesforce Sending IP Address Reputation
- Check Spam Reports and Hard Bounce Rate Reports in Salesforce
- How to Reduce Spam Complaint and Hard Bounce Rate
- Check Subject Line for Words or Special Characters That Trigger Spam Filters
- Check Content for Words, Images or Links That Trigger Spam Filters
- Check Image-to-Text and Link-to-Text Ratio
- Verify if Descriptive Image Alt Tags Are Present
- Perform an Inbox Placement Test and See Where It Goes
- Fix Poor Domain Reputation
- Frequently Asked Questions
How Important is Salesforce Deliverability?
Email deliverability directly impacts your business’s bottom line.
When your messages don’t reach their intended recipients, you experience:
- Lost revenue opportunities from missed sales communications
- Reduced effectiveness of marketing campaigns
- Damaged customer relationships due to missed support responses
- Wasted resources on email campaigns that never reach their audience
Research shows that up to 20% of legitimate business emails never reach the inbox.
For Salesforce users sending thousands of emails daily, this translates to hundreds or thousands of missed connections with customers and prospects.
Email deliverability isn’t just a technical concern—it’s mission critical.
Each email that lands in spam represents a potential missed opportunity, whether it’s a sales follow-up, marketing announcement, or customer service communication.
The good news is that most deliverability issues can be resolved by implementing proper authentication methods and following email best practices.
Let’s explore how to diagnose and fix these issues step by step.
Check Current Authentication Records
Before making any changes, it’s important to assess your current email authentication setup.
HelloInbox’s Check My Domain tool provides a quick and comprehensive analysis of your domain’s email authentication records.
To check your current configuration:
- Navigate to the HelloInbox homepage
- Enter your name and valid email address
- Enter your domain name (the one you use to send emails from Salesforce)
- Click the button Check My Domain
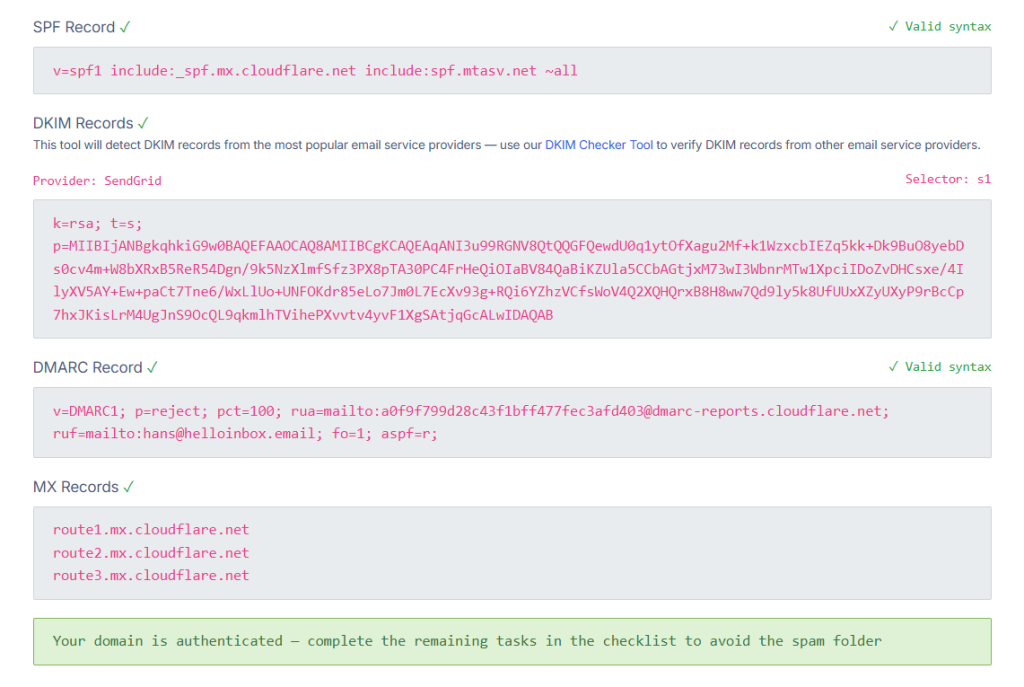
The tool will analyze your existing SPF, DKIM, and DMARC records and provide a report indicating:
- Whether your authentication records exist
- If they’re properly configured
- Any issues that need to be addressed
This diagnostic step is crucial as it establishes a baseline for your current email authentication setup and identifies specific areas for improvement.
Make note of any missing or incorrectly configured records, as we’ll address these in the following sections.
Set up SPF Record for Salesforce
SPF (Sender Policy Framework) is an email authentication method that helps prevent email spoofing by verifying that messages from your domain are sent from servers authorized by your organization.
To set up an SPF record for Salesforce:
- Log in to your domain registrar or DNS hosting provider
- Locate the DNS management section
- Find your existing SPF record (if one exists) or create a new TXT record
- If you already have an SPF record, you’ll need to modify it to include Salesforce’s sending servers
- Add Salesforce’s SPF information to your record
For a standard Salesforce implementation, your SPF record should include:
v=spf1 include:_spf.salesforce.com ~allIf you already have an SPF record, you’ll need to append the Salesforce include statement rather than creating a separate record. For example:
v=spf1 include:your-existing-mail-provider.com include:_spf.salesforce.com ~all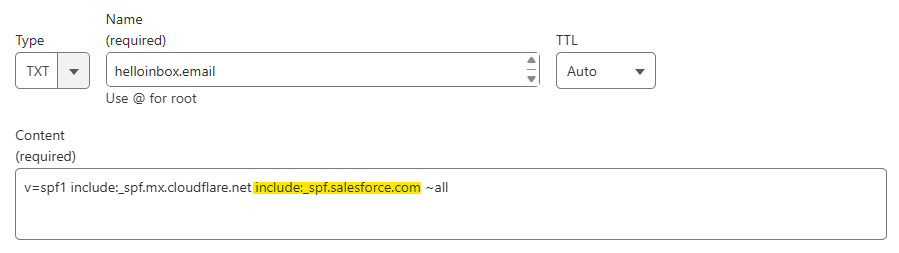
Important notes:
- Only one SPF record can exist for a domain
- The “~all” qualifier at the end means “softfail,” which is recommended for most organizations
- Allow 24-48 hours for DNS changes to propagate globally
A properly configured SPF record significantly improves your deliverability by confirming to receiving mail servers that your Salesforce emails are legitimate and authorized.
Set up Email Authentication in Salesforce
Salesforce provides built-in tools for configuring DKIM (DomainKeys Identified Mail) authentication, which adds a digital signature to your outgoing emails.
This signature verifies that the email was sent by an authorized sender and hasn’t been tampered with in transit.
To set up DKIM in Salesforce:
- From Setup, enter “DKIM Keys” in the Quick Find box, and select DKIM Keys
- Click Create New Key
- Select the RSA key size (2048-bit is recommended for better security)
- For Selector, enter a unique name to identify the key
- For Alternate Selector, enter another unique name (this allows Salesforce to auto-rotate your keys)
- Enter the domain name used to send emails from your Salesforce org
- For domain match pattern, choose the appropriate option:
- example.com – Signs emails from the domain level only
- *.example.com – Signs emails from subdomains only
- example.com,*.example.com – Signs emails from both domain and subdomain levels
- Save your changes
After creating the key, Salesforce will generate CNAME records that you need to add to your DNS:
- From the DKIM Keys page, click on the key you created to view details
- Note the CNAME and Alternate CNAME records displayed
- Add these records to your domain’s DNS through your registrar or DNS provider
- Wait for DNS propagation (24-48 hours)
- Return to the DKIM Key Details page in Salesforce and click Activate
As explained in Salesforce documentation, each DKIM key pair consists of a private key (stored securely in Salesforce) and a public key (published to your DNS).
When Salesforce sends an email on your behalf, it signs the message with your private key.
The recipient’s email server then checks this signature against your public key to verify authenticity.
For security purposes, Salesforce automatically rotates your DKIM keys every 30 days, which is why the alternate selector is needed.
Set up DMARC Record and Monitoring
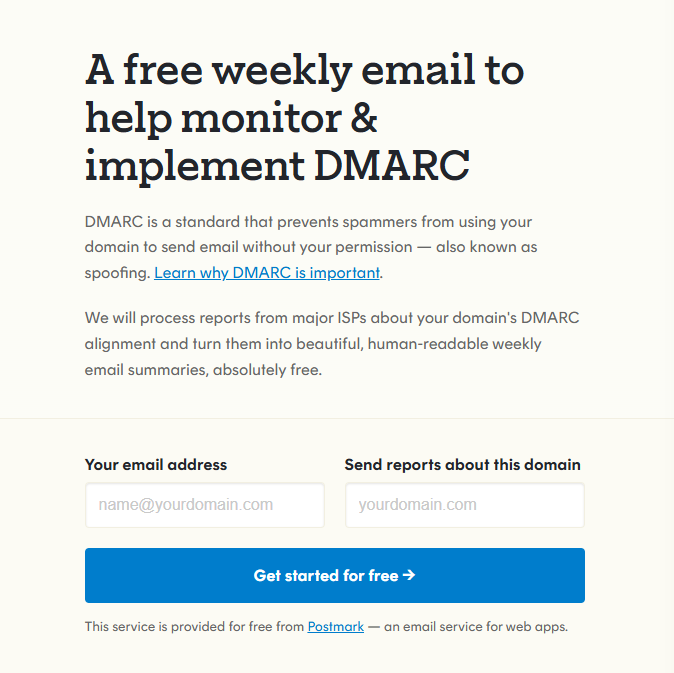
DMARC (Domain-based Message Authentication, Reporting & Conformance) builds upon SPF and DKIM to provide additional protection against email spoofing and phishing attacks.
It also gives you visibility into how your domain is being used in email communications.
To set up a DMARC record:
- Visit Postmark’s DMARC tool
- Create a free account
- Follow the wizard to generate a DMARC record for your domain
- Add the generated TXT record to your domain’s DNS settings
A basic DMARC record looks like:
v=DMARC1; p=none; rua=mailto:[email protected]; ruf=mailto:[email protected]; pct=100Where:
p=noneindicates monitoring mode (no enforcement actions)ruaspecifies where aggregate reports should be sentrufspecifies where forensic reports should be sentpct=100applies the policy to 100% of emails
The Postmark DMARC monitoring service automatically processes these reports for you, providing valuable insights into:
- Who is sending email using your domain
- Whether these messages are passing SPF and DKIM authentication
- If any suspicious activity is occurring
Once you’ve established monitoring and gained confidence in your email authentication setup, you can gradually increase enforcement by changing the policy from p=none to p=quarantine and eventually to p=reject.
This phased approach allows you to identify and fix any legitimate email sources that might be affected by strict DMARC policies before fully enforcing them.
Add Your Domain to Google Postmaster Tools
Google’s Postmaster Tools provide valuable insights into how Gmail—one of the largest email providers—handles emails from your domain.
This free service offers data on deliverability, reputation, and spam complaints.
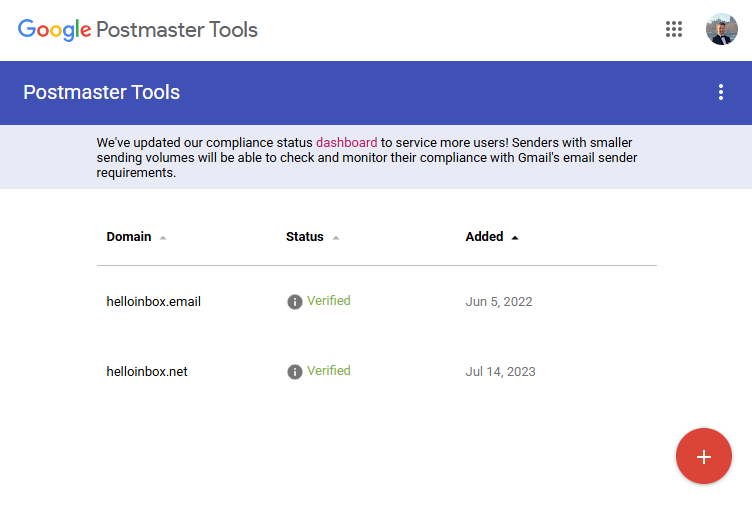
To set up Google Postmaster Tools:
- Visit Google Postmaster Tools
- Sign in with a Google account
- Click on the big red circle button to add your domain
- Enter your domain name
- Verify ownership by adding the provided TXT record to your DNS
- Once verified, you’ll gain access to your reports
The data available through Postmaster Tools includes:
- Domain reputation
- Spam complaint rate
- IP reputation
- Feedback loop data
- Authentication results
- Encryption statistics
- Delivery errors
This information is invaluable for understanding how Gmail users interact with your emails and identifying potential deliverability issues specific to Gmail recipients.
Check Domain Reputation and Spam Rate Reports in Google Postmaster Tools
Once your domain is set up in Google Postmaster Tools, you can monitor several key metrics that directly impact your deliverability to Gmail users:
Domain Reputation
Google rates your domain’s reputation on a scale from “Bad” to “High.” This rating is based on:
- Past sending behavior
- Recipient engagement
- Complaint rates
- Authentication status
A “High” reputation means your emails are likely to be delivered to the inbox, while “Bad” indicates serious deliverability issues.
Spam Rate
This metric shows the percentage of your emails that recipients mark as spam.
Google considers:
- User-initiated spam reports
- Low engagement rates
- Content patterns similar to known spam
For optimal deliverability, aim to maintain a spam rate below 0.1%.
Authentication
The authentication dashboard shows the percentage of your emails that pass SPF, DKIM, and DMARC checks.
Ideally, 100% of your emails should pass all three authentication methods.
Regularly monitoring these metrics allows you to:
- Identify sudden changes in reputation that might indicate problems
- Track the impact of any changes you make to your email program
- Detect potential abuse of your domain
- Verify that your authentication methods are working properly
If you notice negative trends in any of these areas, you can take proactive steps to address them before they significantly impact your deliverability.
Check Salesforce Sending IP Address Reputation
Salesforce sends emails through shared IP addresses unless you’ve purchased dedicated IPs.
The reputation of these sending IPs can affect your deliverability, regardless of your domain’s reputation.
To check your sending IP reputation:
- Identify the IP addresses Salesforce uses to send your emails:
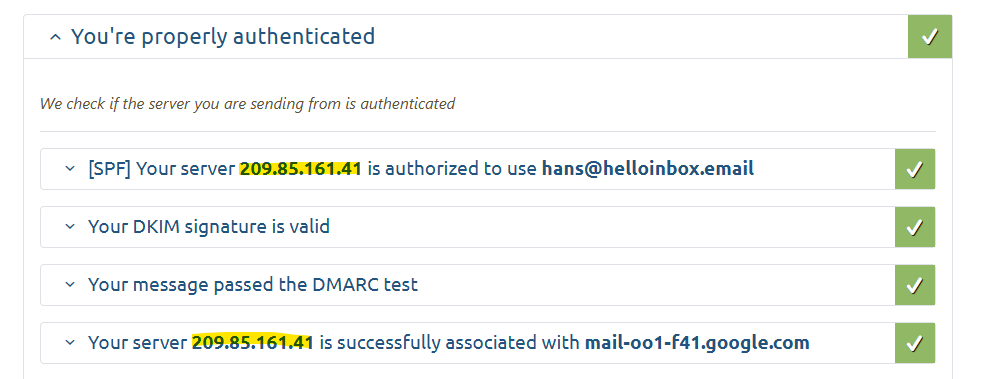
- Send a test email from Salesforce using Mail-Tester.com
- Click the big blue button Then check your score
- Scroll down to and expand the section titled You’re properly (or not) authenticated
- Look for the IP address
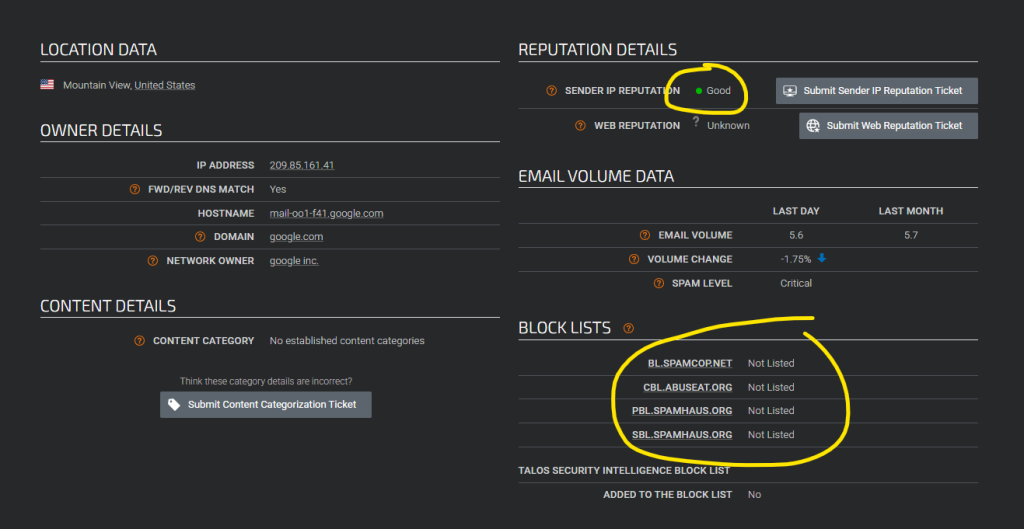
- Check the reputation of these IPs using free tools like:
If you don’t have a dedicated IP then your emails will come from Salesforce’s shared IP pool, in which case the IP address will likely change every time you perform a test. You can either perform multiple tests or use a tool like Emailable or GlockApps to perform an inbox placement test to identify all your sending IP addresses.
If you discover that Salesforce’s shared IPs have poor reputation, you might consider:
- Purchase a dedicated IP address from Salesforce (only recommended for high-volume senders above 50,000 emails per month)
- Implement a gradual warmup plan for your new dedicated IP
- Contact Salesforce support to address any issues with their shared IPs
Remember that IP reputation is dynamic and based on the sending behavior of all organizations using that IP.
This is why high-volume senders often prefer dedicated IPs they can fully control.
Check Spam and Hard Bounce Rate Reports in Salesforce
Salesforce provides detailed reports on email performance metrics that can help identify deliverability issues.
High spam complaint rates and hard bounces are particularly important indicators of potential problems.
To access these reports in Salesforce:
- From Setup, enter “Deliverability” in the Quick Find box
- Select Email Deliverability
- Click on View Reports in the Email Statistics section
The key metrics to monitor include:
Hard Bounces
A hard bounce occurs when an email cannot be delivered due to a permanent issue, such as:
- Invalid email address
- Blocked domain
- Non-existent domain
A healthy hard bounce rate should be below 2%.
Rates above this threshold suggest list quality issues that need addressing.
Spam Complaints
These are reported when recipients mark your emails as spam.
A healthy spam complaint rate should be below 0.1%.
Higher rates indicate that:
- Your content may be triggering spam filters
- Recipients don’t recognize your sender information
- Your email frequency may be too high
- The content may not match recipient expectations
Delivery Rate
This metric shows the percentage of emails successfully delivered.
For a healthy email program, aim for a delivery rate above 95%.
If you identify concerning trends in these metrics, Salesforce’s reporting tools can help you drill down to identify:
- Specific templates with high complaint rates
- User groups experiencing deliverability issues
- Time periods with unusual patterns
Addressing these issues promptly is essential for maintaining good sender reputation and improving deliverability.
How to Reduce Spam Complaint and Hard Bounce Rate
Improving your spam complaint and hard bounce rates requires a multifaceted approach focused on list hygiene, content quality, and recipient expectations.
Reducing Hard Bounces:
- Implement double opt-in for all new subscribers to verify email accuracy
- Regularly clean your email lists by removing addresses that haven’t engaged in 6-12 months
- Use an email validation service to verify addresses before sending
- Monitor bounces and automatically remove addresses after a single hard bounce
- Update your lists promptly when receiving unsubscribe requests or change notifications
Reducing Spam Complaints:
- Set clear expectations during the signup process about email content and frequency
- Make your sender information consistent and recognizable across all communications
- Include a clear, prominent unsubscribe link in every email
- Process unsubscribe requests immediately (required by law in many jurisdictions)
- Segment your audience and send targeted, relevant content
- Optimize send frequency based on engagement data
- Personalize content to increase relevance and engagement
Additional Best Practices:
- Gradually increase sending volume when reaching out to inactive segments
- Test emails before large sends to identify potential deliverability issues
- Analyze engagement metrics to identify content that resonates with your audience
- Ask subscribers to add your sending address to their contacts list
- Consider implementing a preference center allowing recipients to choose content types and frequency
By consistently applying these practices, you can significantly improve recipient engagement and reduce the negative metrics that impact deliverability.
Check Subject Line for Words or Special Characters That Trigger Spam Filters
Email subject lines serve as the first impression for both recipients and spam filters.
Certain words, phrases, and formatting choices can trigger spam filters, regardless of the email’s actual content.
Common subject line elements that trigger spam filters include:
Words and Phrases:
- Financial terms: “Free,” “Cash,” “Discount,” “Save,” “Money back”
- Urgency indicators: “Act now,” “Limited time,” “Don’t wait”
- Excessive punctuation: Multiple exclamation points or question marks
- ALL CAPS text: “FREE OFFER” versus “Free offer”
- Sales pressure: “Buy now,” “Once in a lifetime,” “Don’t miss out”
Characters and Formatting:
- Dollar signs ($), especially multiple instances
- Excessive use of numbers
- Special characters used as attention-grabbers (★, ♥, ✓)
- Spaces between each letter (F R E E)
- Unusual symbols to replace letters (Fr33, $ave)
To check your subject lines:
- A/B test different subject lines with small audience segments
- Keep a record of subject lines with high delivery rates
- Review spam filter documentation from major email providers
Best practices for spam-resistant subject lines:
- Keep subject lines under 50 characters
- Be specific and honest about the email content
- Avoid excessive punctuation and special characters
- Use personalization when appropriate
Remember that spam filters evolve constantly, so staying current with best practices is essential for maintaining good deliverability.
Check Content for Words, Images or Links That Trigger Spam Filters
Beyond the subject line, the actual content of your emails is thoroughly analyzed by spam filters.
Modern filtering algorithms are sophisticated, examining multiple elements to determine whether an email should be delivered to the inbox or the spam folder.
Text Content Red Flags:
- Excessive financial terms or promises: “Make money fast,” “Increase your income”
- Health claims: “Lose weight quickly,” “Miracle cure”
- Prescription medication terms, especially related to enhancing performance
- Overuse of exclamation points or ALL CAPS text
- Phrases like “This is not spam” or “Click here”
- Content that doesn’t match the subject line (bait and switch)
Image-Related Issues:
- Large images with minimal text
- Images containing mostly text (attempting to hide spam content in images)
- Broken or improperly formatted images
- Missing alt text for images
- Deceptive images that mimic buttons or links
Link-Related Problems:
- Too many links relative to the amount of text
- Links to known low-reputation domains
- Shortened URLs that hide the destination
- Misleading anchor text that doesn’t reflect the destination
- Links to executable files or suspicious file types
Technical Content Issues:
- Poorly formatted HTML
- Excessive use of JavaScript
- Hidden text (such as white text on white background)
- Code obfuscation techniques
To check your email content:
- Have colleagues review your emails for potential red flags
- Create a content checklist based on previous successful emails
- Maintain a consistent tone and style across all communications
When creating email content in Salesforce, preview the email before sending and consider sending test emails to internal addresses to check for any formatting or content issues that might affect deliverability.
Check Image-to-Text and Link-to-Text Ratio
The ratio of images and links to actual text content is a critical factor in email deliverability.
Spam filters often flag emails with a high image-to-text ratio or excessive links, as these are common characteristics of unwanted emails.
Image-to-Text Ratio Guidelines:
- Aim for an image-to-text ratio of approximately 20:80 (20% images, 80% text)
- Avoid emails that are essentially one large image with minimal text
- Break up larger images into smaller ones with text in between
- Ensure images enhance your message rather than replace textual content
Link-to-Text Ratio Best Practices:
- Limit the number of links to approximately 1 link per 100 words of text
- Avoid clustering multiple links in a single paragraph
- Use descriptive anchor text for links instead of generic “click here” text
- Ensure each link serves a clear purpose in your communication
How to Check Your Ratios:
- Review the HTML version of your email
- Calculate the approximate percentage of the email dedicated to images versus text
- Count the number of links and divide by the word count to determine link density
- Use email testing tools that analyze content ratios automatically
Importance of Balance:
Maintaining appropriate ratios is important because:
- Text-based content allows recipients to understand your message even if images don’t load
- A balanced approach appears more professional and trustworthy
- Proper ratios help establish pattern recognition with spam filters as a legitimate sender
- Recipients on mobile devices or with slow connections can still consume your content effectively
When creating email templates in Salesforce, be mindful of these ratios and regularly test your templates to ensure they maintain a good balance between visual elements and textual content.
Verify if Descriptive Image Alt Tags Are Present
Alt tags (alternative text) for images serve multiple important purposes in email deliverability and accessibility:
- They provide context for images when they don’t load automatically
- They make your emails accessible to visually impaired recipients using screen readers
- They contribute to the text content that spam filters analyze
- They improve the overall user experience across different devices and email clients
Best Practices for Alt Tags:
- Be descriptive and specific – “Our March product catalog featuring spring gardening tools” is better than “March catalog”
- Keep alt text concise – Aim for 125 characters or fewer
- Don’t stuff keywords – Write for humans, not algorithms
- Avoid redundancy – Don’t begin alt text with “Image of…” as screen readers already identify it as an image
- Include relevant information – For product images, consider including the product name and key feature
- Skip decorative images – Use empty alt attributes (alt=””) for purely decorative elements
How to Check Alt Tags in Salesforce Emails:
- When creating an HTML email template in Salesforce:
- Click on each image
- Check the “Alt Text” field
- Ensure each image has appropriate alt text
- For existing templates:
- Open the HTML source
- Look for image tags (
<img>) - Verify each has an
altattribute with descriptive text
- If using Salesforce Email Templates:
- Edit the template
- Review image properties
- Add or update alt text as needed
Impact on Deliverability:
While alt tags alone won’t solve deliverability issues, they contribute to:
- Higher text-to-image ratios (beneficial for spam scoring)
- Better content analysis by spam filters
- Improved engagement from recipients with image loading disabled
- Compliance with accessibility standards (important for many organizations)
Consistently using descriptive alt tags demonstrates attention to detail and respect for recipient preferences, both of which contribute to a professional email presence and improved deliverability.
Perform an Inbox Placement Test and See Where It Goes
An inbox placement test provides concrete data on whether your emails are reaching the inbox, spam folder, or getting blocked entirely across different email providers.
This testing is crucial for identifying deliverability issues before they affect your actual campaigns.
How to Conduct an Inbox Placement Test:
- Use a dedicated testing service such as:
- Create seed lists with test accounts across major email providers:
- Google (Gmail & Google Workspace)
- Microsoft (Outlook & Office 365)
- Yahoo Mail
- Apple Mail
- Send a typical email from your Salesforce account to these seed addresses
- Analyze the results to determine:
- Which providers are delivering to the inbox
- Which are sending to spam
- Which are blocking the emails entirely
- What filtering headers are being applied
Key Metrics to Review:
- Overall inbox placement rate – Aim for 90%+ across providers
- Provider-specific placement – Identify any providers with consistently poor results
- Filtering reasons – Review any available information about why emails were filtered
- Authentication results – Verify SPF, DKIM, and DMARC are passing
When to Conduct Placement Tests:
- Before launching major email campaigns
- After making significant changes to your email templates
- When experiencing unexpected drops in engagement
- Regularly (monthly or quarterly) as a preventative measure
- When testing new audience segments
Based on test results, you can make targeted improvements to your authentication, content, or sending practices specific to the providers where you’re experiencing deliverability challenges.
For Salesforce users, these tests are particularly valuable because they provide objective data about deliverability that complements the platform’s internal reporting tools.
Fix Poor Domain Reputation
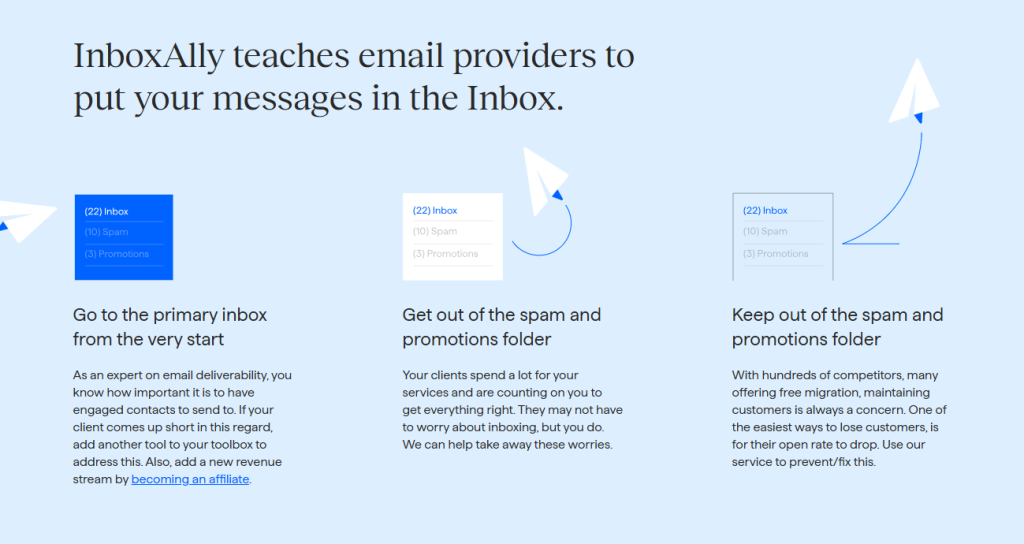
If your domain has a Low or Bad reputation in Google Postmaster Tools, repairing it is certainly possible with the right email warmup tool.
Services like InboxAlly.com specialize in email deliverability remediation and can help rebuild your sender reputation.
Understanding Domain Reputation Recovery:
Domain reputation recovery typically involves:
- Identify the cause of reputation damage:
- High spam complaint rates
- Sending to spam traps
- Poor engagement metrics
- Authentication failures
- Content that triggers spam filters
- Sudden volume spikes
- Create a recovery plan that addresses these specific issues
- Implement remediation strategies over time, as reputation recovery is rarely immediate
DIY Reputation Recovery Steps:
If working with a paid service isn’t feasible, consider these steps:
- Drastically reduce sending volume to your most engaged recipients only
- Perfect your authentication setup (SPF, DKIM, DMARC)
- Clean your lists thoroughly, removing inactive subscribers
- Improve content to boost engagement
- Gradually increase volume as metrics improve
- Monitor key metrics closely throughout the recovery process
Timeline Expectations:
Domain reputation recovery typically takes:
- 2-4 weeks for minor issues
- 1-3 months for moderate problems
- 3-6+ months for severe reputation damage
During recovery, maintain consistent, predictable sending patterns and focus on quality over quantity in your email program.
Patience is essential, as trying to rush the process can further damage your reputation.
Services like InboxAlly.com will kickstart and speed up the recovery process.
Frequently Asked Questions
Why are my Salesforce emails going to spam even after implementing authentication?
Authentication is just one factor in deliverability. Content quality, sending practices, list hygiene, and engagement metrics all contribute to inbox placement. Review all elements of your email program to identify the specific cause.
Should I use a dedicated IP address for my Salesforce emails?
Dedicated IPs are recommended for organizations sending over 50,000 emails per month. If you send lower volumes, Salesforce’s shared IPs often provide better deliverability, as they maintain consistent sending patterns.
What’s the difference between SPF, DKIM, and DMARC?
- SPF verifies that an email comes from an authorized sending server
- DKIM adds a digital signature to verify the email hasn’t been tampered with
- DMARC builds on both by specifying what should happen to emails that fail these checks and providing reporting
How often should I clean my email lists?
At minimum, review your lists quarterly to remove hard bounces, unsubscribes, and long-term non-engagers. More frequent cleaning (monthly) is better for maintaining optimal deliverability.
Can Salesforce automatically remove bounced email addresses?
Yes, Salesforce can be configured to automatically process bounces and update contact records. Navigate to Setup > Email Administration > Bounce Management to configure these settings.
What’s the ideal frequency for sending marketing emails?
There’s no one-size-fits-all answer. The ideal frequency depends on your audience, content value, and industry norms. Test different frequencies with smaller segments and monitor engagement metrics to determine what works best for your specific audience.
Does email engagement affect deliverability?
Absolutely. Major email providers like Gmail and Outlook heavily weigh recipient engagement (opens, clicks, replies) when determining inbox placement. Focus on creating valuable, relevant content that encourages positive engagement.
How do I know if my emails are being throttled?
Unusually slow delivery times, emails arriving in batches, or delayed delivery reports in Salesforce can indicate throttling. Check sending logs for warning messages about rate limits or delivery delays.
What’s the most common cause of deliverability problems?
Poor list hygiene is frequently the root cause of deliverability issues. Sending to invalid addresses, spam traps, or non-engaged recipients damages your reputation more quickly than almost any other factor.
